
Robot Mounting Board Diagram
The weekend before last was Maker Faire Bay Area – and I had a problem. With a few days ago, my PlotterBot and the display board were done, but I still needed to figure out how to set up the robot in my booth.
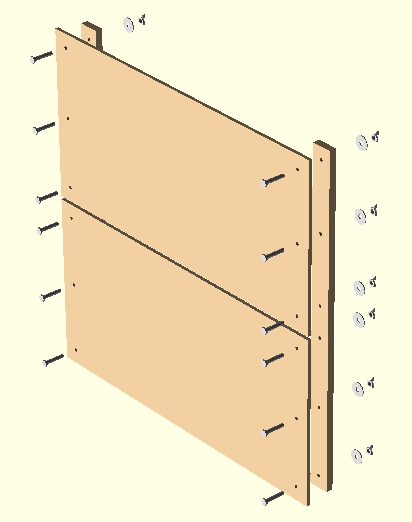
Before I had built the robot into a 3-foot-wide wooden box, it had been mounted on a 2-foot by 4-foot piece of plywood. My problem was that I had to rig a mount for the robot (a) without uninstalling it from the cool project box (b) could be easily assembled and disassembled and (c) would fit in our car’s trunk. The above diagram depicts how I solved this problem.
The project box I used for my robot is a long shallow wooden box – about 3′ long, 2″ deep, and roughly 8″ tall. After drilling a few holes at the top of the above assembly, I mounted my robot to the top sheet of plywood and was ready to start drawing 4′ tall pictures. If you want to make something similar give this a shot:
MATERIALS (total cost ~$33)
- One 1″ x 3″ x 8′ lumber (~$2)
- Two 2′ x 4′ x 0.5″ plywood or particleboard (~$14/both)
- Twelve 2″ long 1/4″ bolts (~$0.75/each)
- Twelve 1/4″ washers (~$0.10/each)
- Twelve 1/4″ wingnuts (~$0.50/each)
- Masking or painter’s tape
TOOLS
- Drill
- Saw
BUILD
- Saw the 1″ x 3″ x 8′ board in half to get two 1″ x 3″ x 4′ boards.
- Short story: Part of the reason
- Lay the two 2′ x 4′ sheets of plywood next to each other to form a 4′ x 4′ sheet.
- Most sheets of plywood have some warp to them. When laying the two sheets next to one another, try rotating and flipping the boards over to make sure the two boards meet together evenly. I say “evenly” rather than “flatly” because the two boards would still work together just fine if they are warped similarly where the they meet.
- Lay the two 1″ x 3″ x 4′ boards on either edge of the 4′ x 4′ sheet, so that they cross the spot where the two sheets of plywood meet.
- Drill six evenly spaced 1/4″ diameter holes through each board.
ASSEMBLE
- Put a bolt through each hole in the plywood and 1″ x 3″ x 4′ boards, as shown in the diagram above.
- Add the washer and thread the wingnuts on to the bolts.
PRO TIP: Place a long strip of tape across the seam between the two sheets of plywood. This will help minimize the impact of the seam when the robot is drawing. If the seam is particularly uneven, tape long sheet of paper over the seam.
The beauty of this project is that it is a quick, cheap, and easy way to have a large portable (or permanent!) drawing surface for your robot that can be assembled or disassembled in minutes.