BrachioGraph by Daniele Procida

BrachioGraph by @evildmp / Daniele Procida

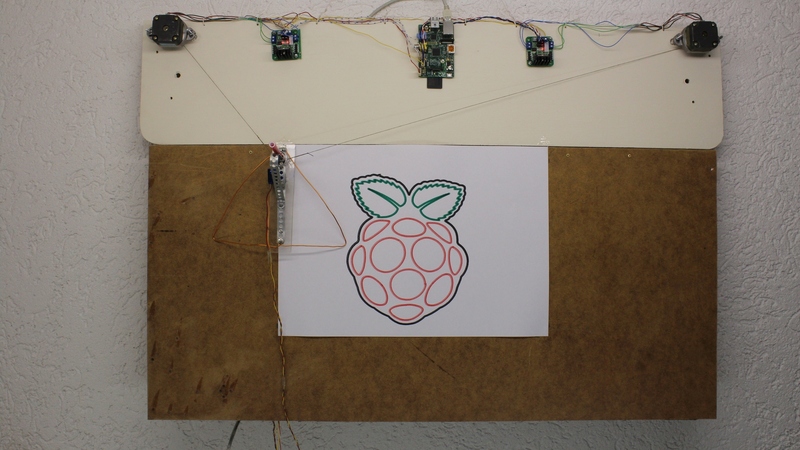
It would be incredibly difficult for me to pick my favorite kind of plotter / drawing robot. I love hanging plotters for their impressive scale and low cost. I love EMSL’s AxiDraw and EggBots for their incredible precision, bulletproof design, fantastic support, and deep community.

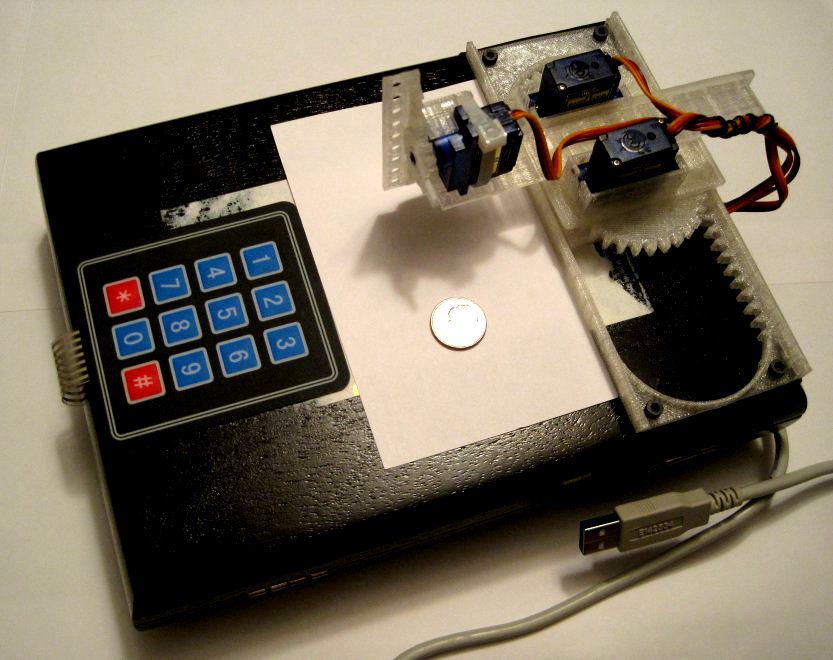
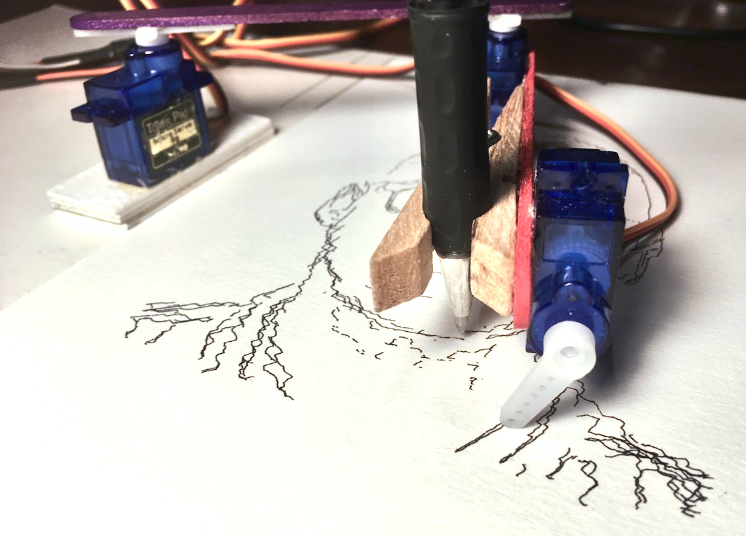
But, I’ve got a real soft spot for a microcontroller + 3 servos. Daniele’s BrachioGraph is a self-described “cheapest, simplest possible pen plotter.” Seeing as how there’s little more to this drawing robot other than a Raspberry Pi Zero, three micro servos, a USB cable, a pen, a few bits of wire and … just … stuff? (Some of their pictures include popsicle sticks, clothes pins, binder clips, nail files, and presumably glue or rubber bands. Despite the deceptively simple build of materials, the GitHub has 34 contributors and has continued to be developed over the last 4 years, and as recently as 5 months ago.

In fact, this project has been around so long (since 2019) that a write up on the Raspberry Pi blog describes the microcontroller as being “$5 Raspberry Pi Zero.” Ever since RPi Zero’s became unobtainium, it’s difficult to find them scalped for as little as $25, let alone the current sticker price of $10.

Hanging Wall Plotter by HomoFaciens

“V plotter” / Hanging Wall Plotter by Norbert “HomoFaciens” Heinz

I’m very late to the party noticing the stripped down, simplified, and well documented hanging wall plotter by Norbert “HomoFaciens” Heinz posted by Liz Upton back in 2015! Norbert’s blog post provides lots of photos and details, while his videos more information with additional nuance.

One of the things I love about this style of drawing robot is that all the materials and hardware are fairly inexpensive, much of it can be built out of materials people already have or could salvage, almost any part can be over-engineered or streamlined, and the results are almost disproportionately amazing.

Great project Norbert!

Maker Faire 2018 – 3D Printing for Home Improvement

If you’re here checking out my site after my presentation, you can check out all the slides from my presentation above. If you’d like more information about the individual things in the slides, I posted an update for most of them over on Hackaday. If you’ve still got some questions, feel free to leave a comment below, hit me up on twitter, email me directly.

Maker Faire Bay Area 2017: PlotterBot and Vacuum Former

Maker Faire Bay Area 2017: Where to find me!

Maker Faire Bay Area 2017: Where to find me!

I’m going to be at Maker Faire Bay Area 2017!

You can find my PlotterBot booth in Zone 6 in the Make Robots tent.

You can catch my talk about how to make an inexpensive and versatile vacuum former in Zone 4, MAKE: Show & Tell stage on Sunday from 1:15 pm – 1:30 pm. In case you can’t make it to the talk, here’s all of my slides with links below to everything you’ll need to make one of your own!

Maker Faire 2016 Drawing Robot Presentation Slides

Maker Faire Bay Area 2016 was a wild ride!  If you were able to come to my presentation on tiny drawing robots – thank you!  If you weren’t able to make it, I’m sorry I missed you.  I got to see some old friends1 and make some new ones2 , which is probably the biggest reason I blog and exhibit and present at Maker Faire.

Admittedly, I was a concerned that I would be talking to a bunch of empty benches, that I would run through all of my slides in the first five of my allotted 25 minutes, or that I would be presenting to a completely silent crowd.  If you came to the presentation, you got to see that none of those things happened.  I started talking to the crowd a little early, answering some questions and letting people try out my demonstration robot with the keypad.  When I actually started the presentation the benches were full and there were several people standing around them.  There were some really great questions from the audience and lots of enthusiastic ideas.

If you didn’t come to the presentation, you missed both of my daughters making impromptu appearances, one uncooperative robot, one cooperative robot, and you had the chance to grab a “maker card” and actually use my demonstration robot.

As promised, I’ve posted my slides (above) so you can relive the magic.

  1. Like you Kongorilla! []
  2. Like you Robert, Vanna, Elijah, and Matt []

Care and Feeding of Your TinyCNC Drawing Robot

Draw on the go with a small Arduino-powered CNC robot!

I’m bringing this fully assembled robot to Maker Faire on Sunday!

During my presentation at Maker Faire on Sunday I’ll be showing people how to build their very own TinyCNC drawing robot.  However, some things are best done in a written form – so you can refer back to the instructions while you work.

  1. Print these parts on a well-calibrated 3D printer
  2. Use the 8 plastic printed parts, 3 servo motors, and one zip tie to assemble the robot
  3. Wire the robot to your favorite microcontroller
  4. Program your microcontroller to make your robot do nifty things

How to Build a Tiny Drawing Robot at Maker Faire Bay Area 2016

Drawing Robots at Maker Faire 2016!

Drawing Robots at Maker Faire 2016!

I’ll be doing a short presentation on how to build (and operate) a tiny drawing robot at Maker Faire Bay Area 2016.  My time slot is Sunday May 22, 2016 from 11:00am to 11:25am at the Make: Electronics stage in Zone 2 aka “Expo Hall.”  You can see where I’ve outlined Zone 2 and the Make: Electronics stage in the above picture.

If you’re around, I’d love to see you.  However, I know how hectic Maker Faire can be and how difficult it can be to get anywhere.  If you want to hang out, I’m planning to go to the Maker Paella Dinner on Friday night on the Maker Faire grounds and the Hackaday meetup on Saturday night O’Neill’s Irish Pub in San Mateo.1

  1. Tickets to the Hackaday meetup are free – just follow the link and RSVP []

Don’t let SkyNet win! Take this poll!

Do NOT let this happen!

I want to put some finishing touches on my TinyCNC drawing robot before Maker Faire, but I’m a little ambivalent about how best to show off it’s drawing/CNC abilities.1 There are several excellent ways to control such a robot – perhaps you can help me decide?  My thought is that an IR remote would be really nifty, since I could just hand the “control” to someone and they could play with the robot, getting it to draw something.  Then again, feeding gcode to the ‘bot and having it actually draw something semi-recognizable would also be great.2

What's the best way to control a TinyCNC / drawing robot?

View Results

Loading ... Loading ...

For context, here’s the links to the various possible ideas for control mechanisms:

Please vote above3 and let me know what you’d like to see working at Maker Faire!

  1. Photo by tenaciousme []
  2. Heck, the robots are small enough that I’ll probably bring more than one. []
  3. Or, comment below []

TinyCNC – Working Keypad UI

If you’re still on the fence about trying to build your own drawing robot/plotterbot, take heart.  (Skip to the bottom of the post if you want to check out the latest 3D printable files and Arduino code.)  If a relative newbie such as myself can make a go of it, I’m pretty sure you can too.

Last night1 I finally got the little ‘bot to really make use of the keypad as a modest user interface.  The robot is now using the USB cable purely for power purposes, rather than requiring the serial connection to the Arduino serial monitor as well drawing power from the USB port.  Now I can just connect the USB cable to a random USB charging device and operate the robot in a meaningful way by using the keypad.

In addition to the keypad direction system described in a previous post, now the “*” and “#” keys also have a usage.  The “*” key now starts and stops the Arduino from logging the inputs.2 Pressing the “#” key will play the most recently recorded inputs.

My record/playback system is super hacky and the ‘bot sometimes jitters before carrying out a command.  I’ll also have to implement a few additional changes to the design of Y axis before it can hold a pen reasonably stead.

But, it works!

Download the latest stable 3D printable parts on Thingiverse, latest Arduino sketch from Github, and play with one for yourself!

  1. Well, technically this morning? []
  2. If you forget whether it has been toggled to start or stop recording, the robot performs a little “wave” with the Z axis when it is ready to start recording and three little “waves” when it stops recording. []

TinyCNC: Too Many Ideas

ideas photo

Thinkin’ hard

I’ve been brainstorming ways to make the TinyCNC better:

  1. Drawing and Recording.
    1. My idea is to be able to control the robot through they keypad, perhaps going through the motions for a drawing or to perform a small task, and then have it “replay” the same motions.  Ideally, press the “*” key to start “recording,” draw something with the keypad, press “*” to stop recording, and then press the “#” button to replay the motions.  Could be nifty!
  2. Drawing by Remote Control.
    1. The Adafruit keypad I’m using is great!  There are only two, very minor, problems with it.  First, it requires 7 input pins, which means that I definitely need a full-fledged Arduino to run the robot, even though it can run off a tiny Adafruit Trinket or Digispark.  Second, the buttons are a little difficult for my youngest daughter to press.
    2. Using an IR receiver sensor, I could use a small IR remote to control the robot – which would be great.  Or, I could possibly even use an old remote control from a TV or VCR.12345
  3. Changes to Y Axis.  The Y-axis tends to “droop” when it is fully extended.  If the underside was slightly longer, it could just have a plastic runner that would keep it level.
  4. Changes to Z Axis.  The current Z-axis sucks.  It is very wobbly and not able to hold a pen very well.  If it had a sliding slot/notch system like the XY axes do, it might not be as bad.
  5. Changes to X Pinion/Gear.  If this were very slightly thinner, I wouldn’t have to raise the X rack slightly off the drawing surface.  Or, of course, I could make the X rack slightly taller.

  1. That’s a “video cassette recorder.” []
  2. That’s like a DVD that you have to rewind at top speed before you can watch it again – and where the quality degrades slightly every time you watch it []
  3. Oh.  Sure.  Yes.  A DVD is like a Blu-Ray, only it doesn’t look quite as good on your TV. []
  4. Blu-Ray?  Yeah, okay.  That’s…  like… if you had a coaster that could only stream just one movie off Netflix if you stick into a box next to your TV []
  5. TV?!  Seriously?!  Okay, okay.  It’s like a really big phone that can’t make calls or text. []