
Tiny CNC – Now with 50% more axes!
With some helpful feedback from several readers, I’ve been working on improving the design for the Tiny CNC. Last night I was able to print the latest version and assemble the robot.
Here’s a quick tour of the new features:
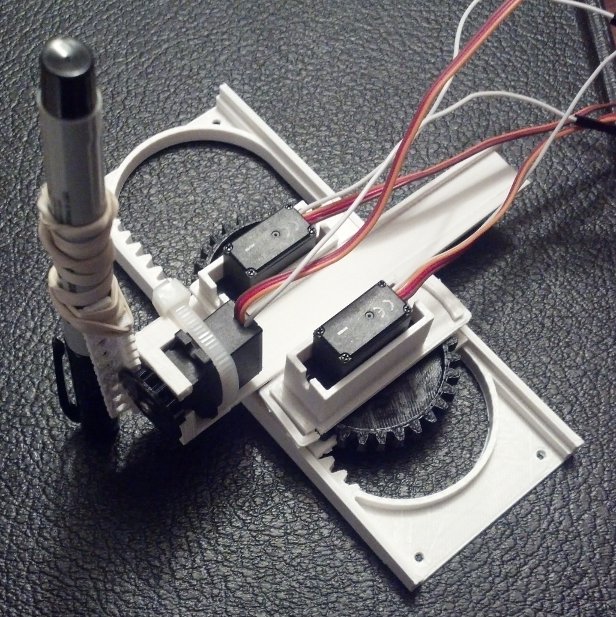
- Z-Axis / Pen Lift. This is by far the most requested feature – and the aspect of this robot I was most anxious to complete. In order work within my design ideals (low part counts, easy printing, etc) I had to make a concession. To fit the Z axis between the X and Y motors, I had to reduce the size of the Z axis gear. The result is that the Z axis can only lift by about 15mm. Thus, the robot has a maximum operational area of 76mm x 76 mm x 15 mm. ((This is about 3″ x 3″ x 0.5″, for you imperialists out there)) While the Z axis lift isn’t anything spectacular, it is sufficient to have an actual drawing robot.
- Low Part Count. The new design consists of 7 unique printed plastic parts, one of which needs to be printed twice, for a total of 8 parts. Designing for a low part count meant that I had to design some fairly (for me) complex parts.
- Easy Printing. I designed all seven parts to be printed easily without support. While there have been vast improvements in 3D printing support structure technology in just the last year, you won’t need any of that. These parts should be easy to print with just about any machine.
- Snap-Fit Design (mostly). I personally enjoy printed parts that just fit together without the need for additional tools and materials. While there’s more work to be done on the design to make sure the parts have a better fit, this iteration just needs to be snap fit together. As you build the robot several of the pieces help keep earlier pieces in place. The only part that doesn’t snap-fit in place is the Z axis motor – which requires a single zip tie.
- Mounting Holes. This version includes a much requested feature – mounting holes. The entire plastic frame is extremely lightweight and the motors can easily make the entire robot hop around. The mounting holes will allow the robot to be bolted or screwed directly to a surface.
To Do List:
- Herringbone Rack and Pinions. It’s still possible to include these – and I’ve even already written the code to incorporate them. However, I’m going to hold off integrating this feature until I can actually draw something.
- Improved Y Rack. The Y rack I am using had one end that lifted off the build platform slightly and is consequently curved. A better version of this part would be wider to eliminate some wobble.
- Balance Y Rack. As mentioned earlier, the entire robot is very light. As the Y axis is fully extended, the Z axis motor can cause the entire robot to tip over or the X stage to pop off the X rack. If there was a weight of some sort at the other end of the Y rack, this may not be such a problem.
- Better Z Axis Holder. Right now the Z axis rack is basically a rack with a plank with holes in it. While it’s not really pretty, it can get the job done. I would like to design and incorporate something that’s a lot more aesthetically pleasing and functional.
Now that I have a robot again, I’m looking forward to trying to draw something with it!
In the meantime, if you’d like to build your own, download the parts from Thingiverse!
Default Series Title
hey brilliant work
can you post a video of the 3 axis one ?
@Akhil: VERY soon… 🙂
Pingback: Competing Design Ideals in a Drawing Robot | PlotterBot