How to Build a Tiny Drawing Robot at Maker Faire Bay Area 2016

Drawing Robots at Maker Faire 2016!

Drawing Robots at Maker Faire 2016!

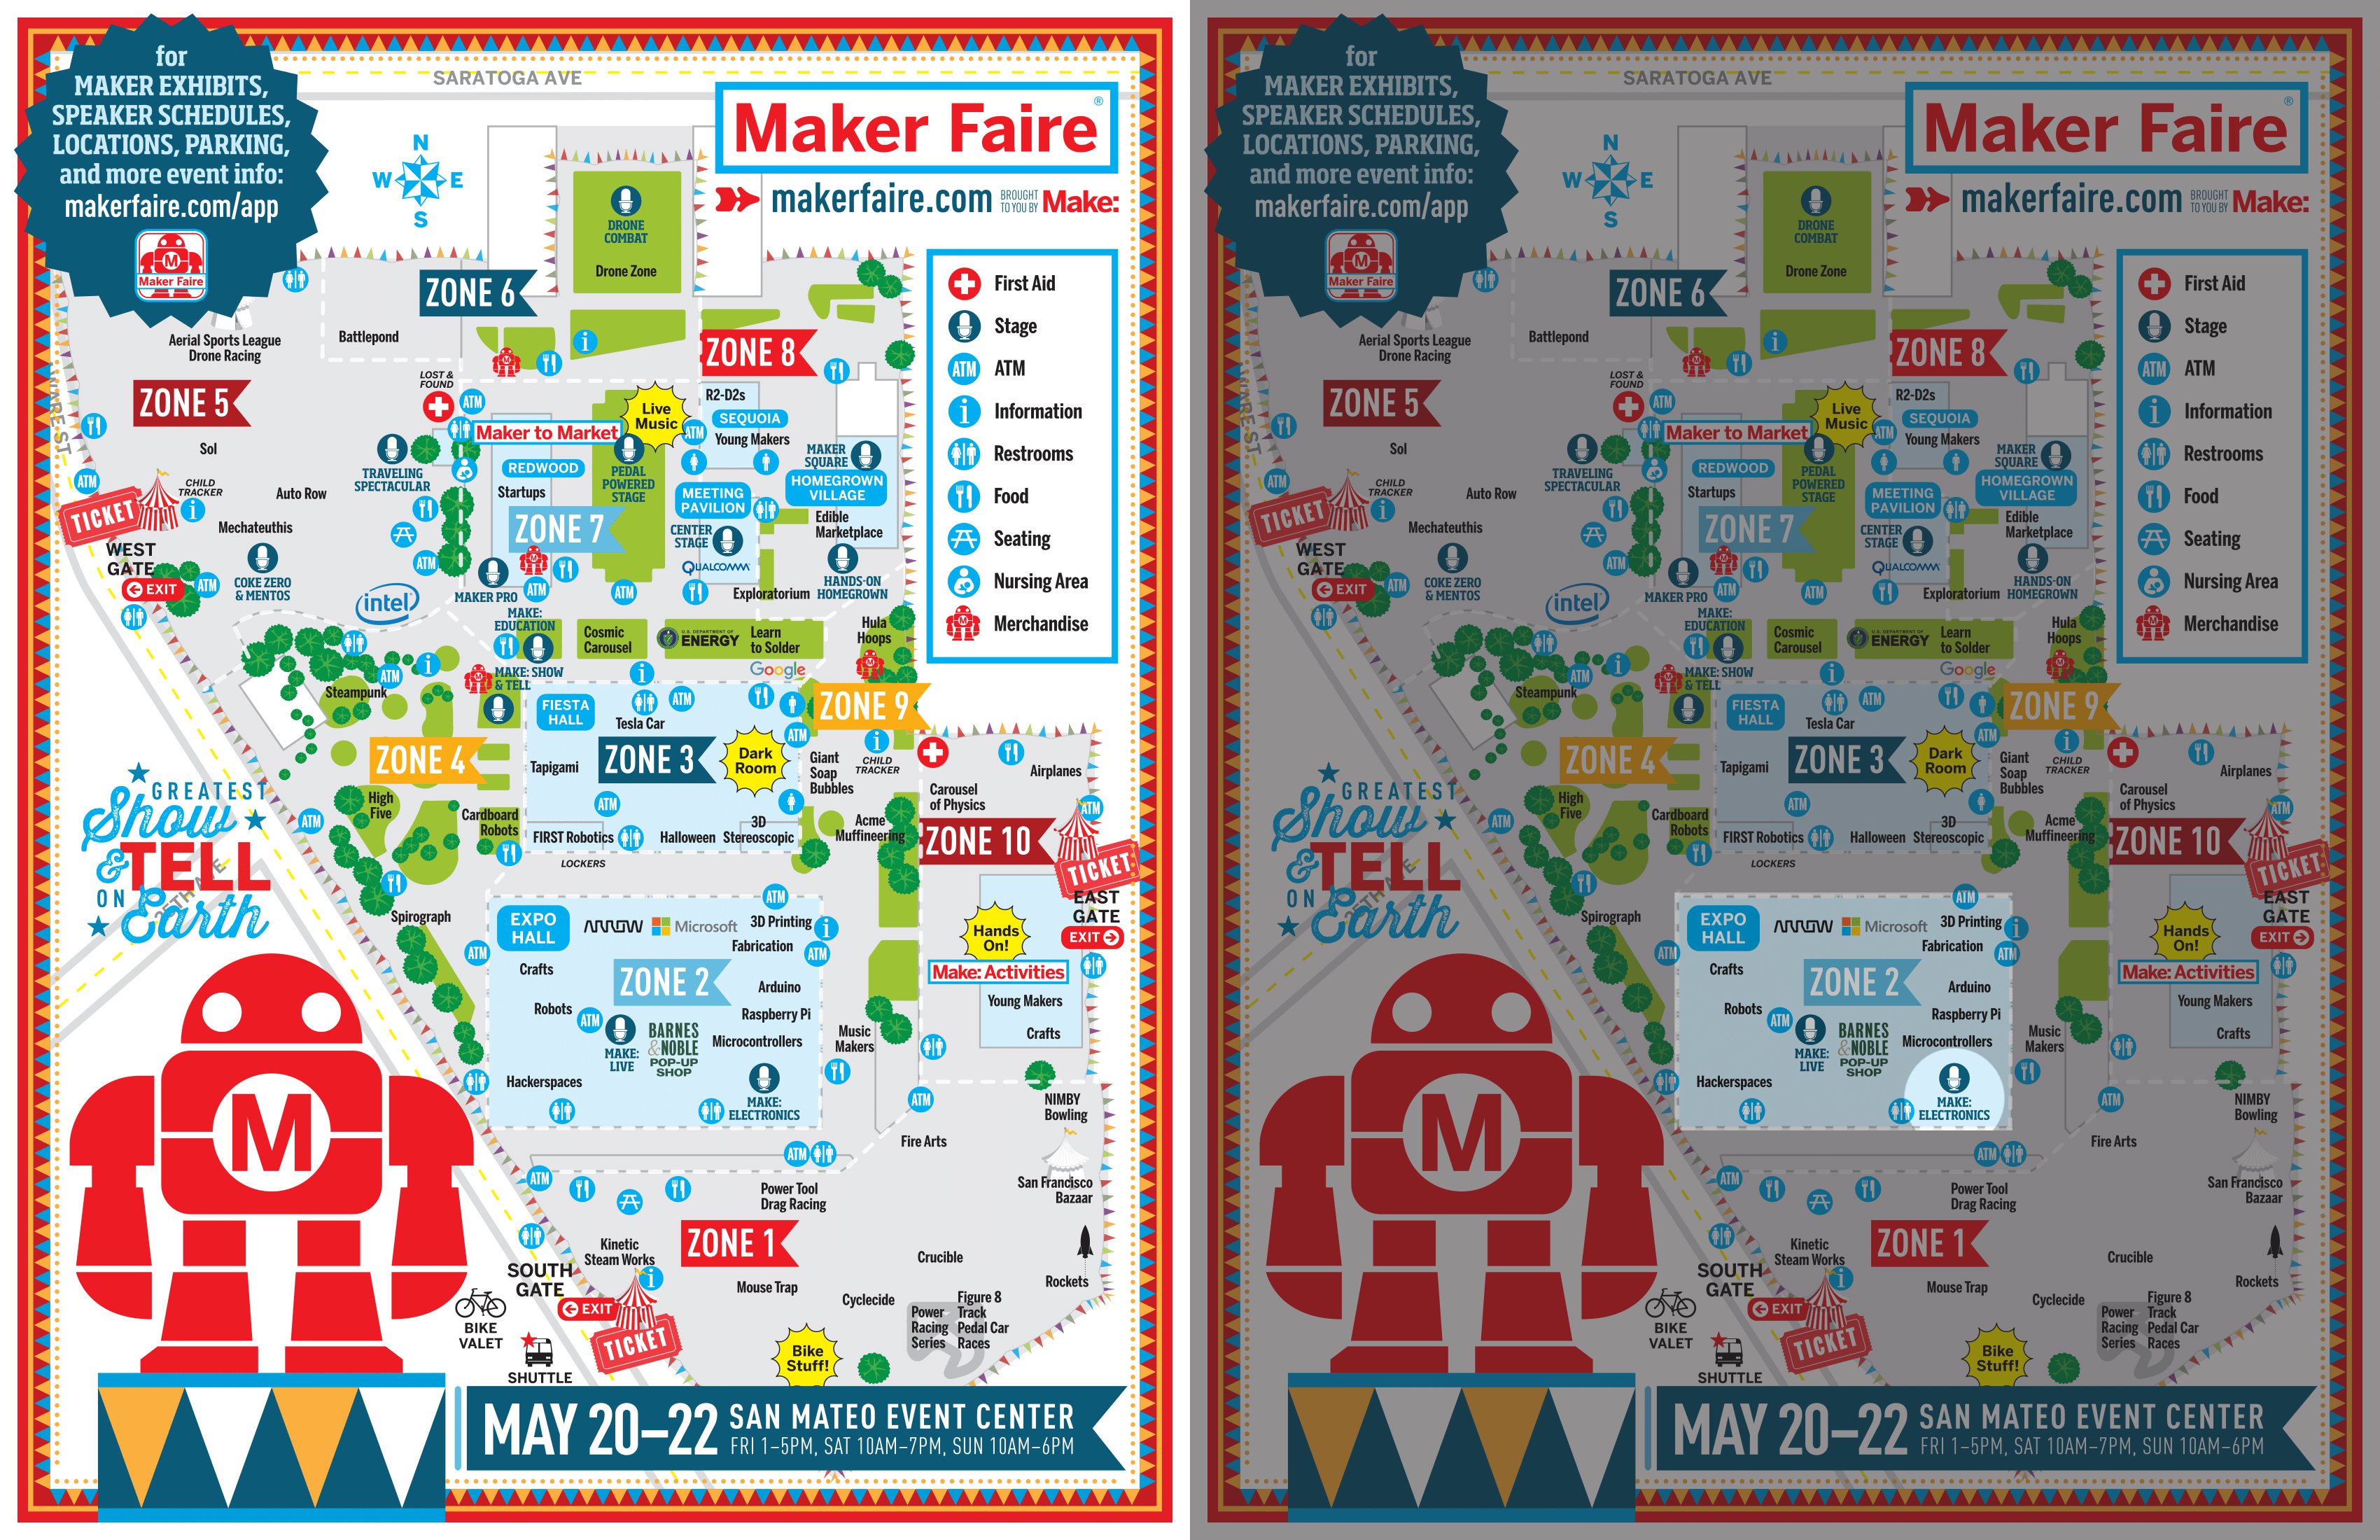
I’ll be doing a short presentation on how to build (and operate) a tiny drawing robot at Maker Faire Bay Area 2016.  My time slot is Sunday May 22, 2016 from 11:00am to 11:25am at the Make: Electronics stage in Zone 2 aka “Expo Hall.”  You can see where I’ve outlined Zone 2 and the Make: Electronics stage in the above picture.

If you’re around, I’d love to see you.  However, I know how hectic Maker Faire can be and how difficult it can be to get anywhere.  If you want to hang out, I’m planning to go to the Maker Paella Dinner on Friday night on the Maker Faire grounds and the Hackaday meetup on Saturday night O’Neill’s Irish Pub in San Mateo.1

  1. Tickets to the Hackaday meetup are free – just follow the link and RSVP []

Bay Area Maker Faire 2013 Drawings

This slideshow requires JavaScript.

I’ve been meaning to share these drawings from Maker Faire Bay Area 2013 for more than a year now.  As I was reinstalling my PlotterBot to its original home on our living room wall I figured this was a good time to take pictures of these drawings to share.  I’ve also added a quick blog post to go with each of these drawings, to add a bit more background.  Here are the links to the Doctor Who dalek poster, Game of Thrones House Stark dire wolf poster, and Breaking Bad’s Walter White poster.

At last year’s Maker Faire my PlotterBot did not have a functional pen lift mechanism.  I had designed a pen holder with this ability in mind, but I still hadn’t actually tried it out.  In fact, it wasn’t until about two weeks after Maker Faire that I actually got a reliable pen lift working.  One of the great things about these “single line super pixelated drawings” is that they’re big and bold.  I also really like the abstract nature of this drawing style and how it promotes appreciating the works from a distance.  The downside to them is that they take a really long time and basically use up an entire pen with each drawing.

I had several other drawings on display back in 2013 – including a traveling salesman problem style Death Star, Yoda, and Nikola Tesla portrait.  This last one I gave to Joey Hurdy when he stopped by the booth just after Maker Faire ended on Sunday.

Building a PlotterBot Arduino Drawing Robot – An Overview

Completed PlotterBot

Completed PlotterBot

A PlotterBot Arduino-based drawing robot is an easy to build robot you can make from off-the-shelf electronics and easily repurposed parts.  At it’s heart, this robot uses a microcontroller to drive motors to reel in and out two spools of wire to move a pen across a vertical surface.  One of the best thing about this particular robot is that it is extremely forgiving.  Your robot will still be capable of drawing huge amazing pictures even if you don’t mount the motors perfectly level, your spools aren’t quite symmetrical, or if your measurements are a little bit off.1

Here’s an overview of what you’ll need to do to build your own PlotterBot:

  1. Parts
    1. 2x Stepper motors
    2. 1x Servo motors (if you want to do pen lifts)
    3. 1x Arduino Uno or greater
    4. 1x Adafruit Motor Shield
    5. USB cable
    6. Power adapter
  2. Hardware and Supplies
    1.  Assorted wire, nuts, bolts, screws
    2. Monofilament fishing line
    3. Solder
    4. A project box or the stuff to build one with
  3. Tools
    1. Soldering iron
    2. Power drill
    3. Screwdrivers, hex wrenches
    4. A 3D printer is very helpful – but not necessary
  4. Assembling the Electronics
    1. Build the Adafruit Motor Shield
    2. Connect the Shield to the Arduino
    3. Load the Polargraph firmware
    4. Connect motors to the shield
    5. Test the assembled electronics
  5. Build the Robot
    1. Connect spools to the stepper motor shafts
    2. Mount the motors in your project box
    3. Wind monofilament fishing line on the spools
    4. Tie the fishing line to your pen holder
  6. Calibrate the Robot
    1. Measure the diameter of the spools and distance between motors
    2. Save your settings and upload your measurements to the robot
  7. Draw
    1. Load pictures into the software and start drawing

Keep in mind that once you have the basics (an Arduino, the shield, and two steppers) you can change the setup to suit your needs.  I’ll discuss more about each of these points, and turning each one into a separate blog post (or more!) soon.

Finally, join the PlotterBot newsletter now so you don’t miss out on the latest information!

  1. Of course, it will do a better job if you get everything right… []

PlotterBot Frequently Asked Questions

Display Posters at Maker Faire Bay Area 2013

Display Posters at Maker Faire Bay Area 2013

Although I’ve helped out at the MakerBot booth several times in prior years, this was the first time I had my very own booth.1 I had a great time answering questions and explaining how the robot worked.  I thought you might be interested in some of the questions:

  • What holds the pen up?  Magnets?
    • My PlotterBot suspends the pen holder by fishing line – which is nearly invisible from more than a foot or so away under normal lighting.  Under very bright light, the shadows of the fishing line do start to appear.  However, from more than a foot or two away, it looks like the pen holder is floating around the surface of the paper.  Unless you notice the motors turning the pulleys, it almost looks magical.
    • Sandy Noble’s Polargraph uses beaded cord and Der Kritzler uses toothed belts.  While these machines lack the “magic quality” one gets from using fishing line, the are a capable of more repeatable accuracy.
  • What software do you use?
    • I use Sandy Noble’s Polargraph firmware and software, running on an Arduino Mega shield (“Polarshield SD“) of his design.  I purchased most of my electronics directly from Sandy and I can’t recommend them enough.
Maker Faire Display Board

Maker Faire Display Board

  • What kind of accuracy/resolution does it have?
    • This was a difficult question to answer.  To explain I pointed to the large text banner at the top of the project board next to my robot.  You can download all of the materials from my PlotterBot Maker Faire exhibit here or you can see a copy of the text just after I managed my first successful pen lifts.
    • I would estimate that the robot could probably manage to just barely draw from around 30pt font to an arbitrarily large size.  However, if you used beaded cord or, better yet toothed belts, and small sprockets or gears in conjunction with a fine tip pen you could probably manage even finer repeatable accuracy.
  • How fast can it go?
    • I suggested that the entire robot adhered to that most basic of all engineering principles – “Good, cheap, and fast – pick two.”  It’s fairly cheap and easy to build and yields pretty amazing results, but there is a practical upper limit to the speed with which you can operate the robot.  If you run it too fast, the motors may skip steps resulting in poor results.  Also, running it too fast would likely also cause the pen to skip across the drawing surface or might not give the pen enough of an opportunity to leave an ink trail.  For best results, I try to find a speed that works well with my pen holder and pen to draw quickly enough so the pens don’t bleed much and slow enough to get good results.
  • How big can it draw?
    • Basically, an unlimited size.  There are some practical limitations from the Arduino software which suggest that a 63 meter diagonal is the biggest you can accomplish with Sandy’s software.  However, with some more effort to tinker with the code, there’s no real reason why even larger sizes wouldn’t be possible.  Also, the larger the pulleys/sprockets/gears the larger the drawing could be as well.  Bill Ola Rasmussen posted some very interesting mathematical considerations regarding line tension and the practical limitations of resolution at the edges of the machine’s capabilities.  Basically, if you want a big drawing, you need a really big robot.
    • While all this is very abstract, it’s also nice to show how these kinds of robots can reach amazing proportions.  Sandy has used a Polargraph to draw across huge wall sized installations. (About 20 feet wide).  Two similar machines, Hektor which draws in spraypaint and Viktor which draws in chalk, were used to draw on entire walls.
  • What kind of pens do you use?
  • How long does a drawing take?
    • 2′ x 3′ drawing typically takes about 4-6 hours depending upon the density of the drawing and thickness of the marker line.  The longest drawing I’ve ever done took about 8 hours.  And it was AMAZING.
  • How do you create these drawings?
    • The software basically translates normal images (JPG) into very pixelated versions of themselves and then into instructions the robot’s firmware understands.  The process is a little more direct for vector drawings, converting the SVG files directly into instructions for the robot.  I can send the instructions to the robot either over USB or saving them to an SD card which it reads.
  • How much did it cost to make?
    • I sourced all the parts I needed for my first robot, rather than trying to scrounge for motors and wire.  As a result, it probably cost around $100 for a machine that used an Arduino Uno and an Adafruit Motor Shield and had to be tethered to a computer via a USB cable.  For someone willing to tear apart old electronics and hack things together from scrap wood, it could probably be built for around $30-$50.  The robot I had on display cost around $250 in electronics, $10 for the cost of the printed plastic parts, about $40 for the wood and hardware, and a wooden box left over after a catered event.  To buy plastic parts, all the hardware off the shelf, and electronics would probably cost about $500.
  1. Well, I did share the space with my daughter! []

Pen Lift Achievement Unlocked!

Drawing vectors with the PlotterBot

Drawing vectors with the PlotterBot

I recently developed a simple printable pen holder for my PlotterBot.  Although it worked wonderfully as a pen holder for single-line drawings and although I had designed it to work with a servo for pen lifts, I had literally never tried actually using it with pen lifts until yesterday.

Above is my first attempt to draw vectors with pen lifts and, frankly, it came out beautifully.  The design of the pen lift system could not be any simpler.  The pen holder has a mount for the micro servo which holds it as close as possible to the wall-facing surface of the pen holder and a rectangular hole for allowing the servo’s arm to sweep through.  I was concerned that the sweeping action of the servo arm would cause a slight stray mark on the paper.

Despite my concerns, the pen lift test was successful.  It really came down to a matter of balance.  Once I had swapped in a different pen lift arm and connected the pen lift servo cable, I was able to easily adjust the balance by changing the location of the filament attachment.  With the proper balance achieved, the pen lift essentially worked flawlessly.

Today I tried my longest drawing ever, an 8-hour process, with voluminous pen lifts.  The result was… amazing.

Stay tuned for a picture.

Liked our booth at the Maker Faire? Take it home with you!

Subscribe to my mailing list to get a PDF with all the materials from the Maker Faire booth plus all the information, links, videos, and resources you’ll need to build your own PlotterBot from scratch – even if you’ve never tried building anything before!


I promise not to spam you, ever. I will only send you e-mail about how to build your very own robot and updates to any plans.