
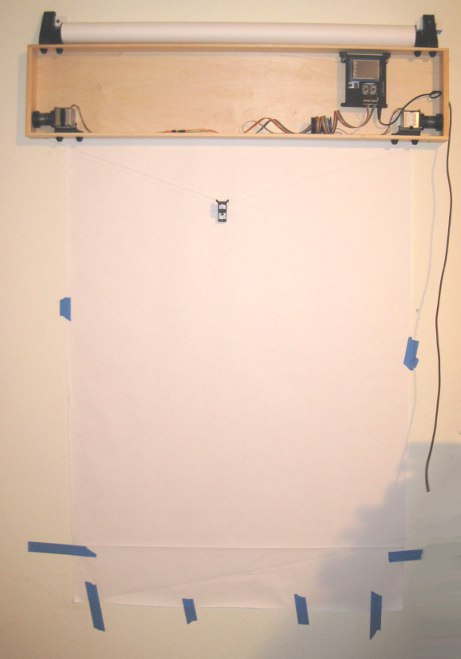
Completed PlotterBot
A PlotterBot Arduino-based drawing robot is an easy to build robot you can make from off-the-shelf electronics and easily repurposed parts. At it’s heart, this robot uses a microcontroller to drive motors to reel in and out two spools of wire to move a pen across a vertical surface. One of the best thing about this particular robot is that it is extremely forgiving. Your robot will still be capable of drawing huge amazing pictures even if you don’t mount the motors perfectly level, your spools aren’t quite symmetrical, or if your measurements are a little bit off. ((Of course, it will do a better job if you get everything right…))
Here’s an overview of what you’ll need to do to build your own PlotterBot:
- Parts
- 2x Stepper motors
- 1x Servo motors (if you want to do pen lifts)
- 1x Arduino Uno or greater
- 1x Adafruit Motor Shield
- USB cable
- Power adapter
- Hardware and Supplies
- Assorted wire, nuts, bolts, screws
- Monofilament fishing line
- Solder
- A project box or the stuff to build one with
- Tools
- Soldering iron
- Power drill
- Screwdrivers, hex wrenches
- A 3D printer is very helpful – but not necessary
- Assembling the Electronics
- Build the Adafruit Motor Shield
- Connect the Shield to the Arduino
- Load the Polargraph firmware
- Connect motors to the shield
- Test the assembled electronics
- Build the Robot
- Connect spools to the stepper motor shafts
- Mount the motors in your project box
- Wind monofilament fishing line on the spools
- Tie the fishing line to your pen holder
- Calibrate the Robot
- Measure the diameter of the spools and distance between motors
- Save your settings and upload your measurements to the robot
- Draw
- Load pictures into the software and start drawing
Keep in mind that once you have the basics (an Arduino, the shield, and two steppers) you can change the setup to suit your needs. I’ll discuss more about each of these points, and turning each one into a separate blog post (or more!) soon.
Finally, join the PlotterBot newsletter now so you don’t miss out on the latest information!
Pingback: Plotterbot Hangs on your Wall to Work
Moar! I have been experimenting with a polargraph setup like this but my sewing bobins as reels are giving horrible results. I can’t wait to see what your solution is. It seems like everyone has their own.
@Kyle: I have a solution already! Check out my 3D printable designs. Those are all the parts you’ll need (except for the pen holder – which is also on Thingiverse) to build a robot just like mine. The trick to the spools is getting the diameter right. A thin diameter thread bobbin accumulates string quickly – so the amount of string spooled off when its full will be much different from when it is nearly empty.
I’m new to this plotter concept & haven’t done my homework (so forgive me if this has been addressed) but couldn’t you get around the spool size problem by using the spools not as winches but as capstans? Instead of the strings wrapping up or storing on the spools, they would wrap around the spools a few turns then drop through holes in the box and attach to counterweights hanging on either side of the drawing area.
@Unfinisher: Absolutely! There are many such plotters. Sandy Noble’s Polargraph uses sprockets and beaded cord and Der Kritzler uses gears and toothed belts. Those methods are great for slightly more consistent results. You can find links to their works on this list of drawing robots.
I chose to go with large-ish spools and monofilament line because with a small child and pets, I didn’t want anyone fooling around with dangling cords. Plus, this allows for a very self-contained mounting solution. I also designed and installed very tiny line guides to help minimize the impact of uneven winding.
Pingback: Sorry guys… | A Requiem Of Midnight
Could you recommend software? I have successfully built a polargraph and i am looking around for alternatives.
@Terance: I personally like Sandy’s Polargraph software. It’s open source, handles SVG and JPG files, does penlifts, etc. You can find his Polargraph software here. However, if that’s not to your liking, Dan Royer’s Makelangelo software is an alternative. This may require some tinkering to get working with your hardware. Good luck!
Thanks for your reply. I forgot to mention that I am running linux. I like the Sandy Nobles software. I was just looking for an alternative to get a different style of drawing. Makeangelo software just runs on OSX and windows.
Hi, what kinds of motors were you successful with? I have seen 200 steps per rev and 400 steps per rev mentioned. Also, what about overheating? Thanks.
@Rachel: I used these 200 step motors from Adafruit. http://makerblock.com/2012/01/drawbot-parts-ordered/ The board did get warm using my Arduino Uno + motor shield setup. My new system using Sandy Noble’s Polargraph shield does not have any overheating problems that I’ve noticed.