TinyCNC – Working Keypad UI

If you’re still on the fence about trying to build your own drawing robot/plotterbot, take heart.  (Skip to the bottom of the post if you want to check out the latest 3D printable files and Arduino code.)  If a relative newbie such as myself can make a go of it, I’m pretty sure you can too.

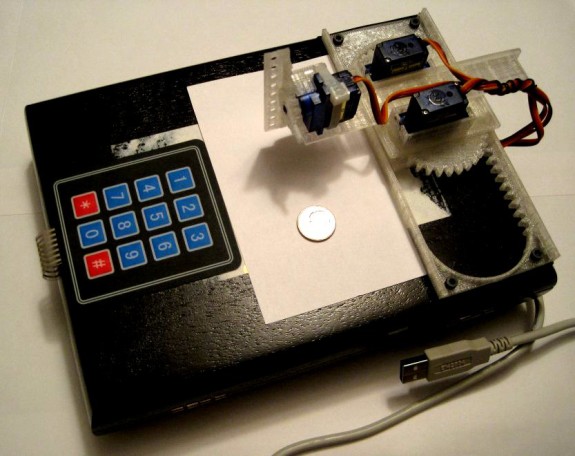
Last night1 I finally got the little ‘bot to really make use of the keypad as a modest user interface.  The robot is now using the USB cable purely for power purposes, rather than requiring the serial connection to the Arduino serial monitor as well drawing power from the USB port.  Now I can just connect the USB cable to a random USB charging device and operate the robot in a meaningful way by using the keypad.

In addition to the keypad direction system described in a previous post, now the “*” and “#” keys also have a usage.  The “*” key now starts and stops the Arduino from logging the inputs.2 Pressing the “#” key will play the most recently recorded inputs.

My record/playback system is super hacky and the ‘bot sometimes jitters before carrying out a command.  I’ll also have to implement a few additional changes to the design of Y axis before it can hold a pen reasonably stead.

But, it works!

Download the latest stable 3D printable parts on Thingiverse, latest Arduino sketch from Github, and play with one for yourself!

  1. Well, technically this morning? []
  2. If you forget whether it has been toggled to start or stop recording, the robot performs a little “wave” with the Z axis when it is ready to start recording and three little “waves” when it stops recording. []

TinyCNC: Too Many Ideas

ideas photo

Thinkin’ hard

I’ve been brainstorming ways to make the TinyCNC better:

  1. Drawing and Recording.
    1. My idea is to be able to control the robot through they keypad, perhaps going through the motions for a drawing or to perform a small task, and then have it “replay” the same motions.  Ideally, press the “*” key to start “recording,” draw something with the keypad, press “*” to stop recording, and then press the “#” button to replay the motions.  Could be nifty!
  2. Drawing by Remote Control.
    1. The Adafruit keypad I’m using is great!  There are only two, very minor, problems with it.  First, it requires 7 input pins, which means that I definitely need a full-fledged Arduino to run the robot, even though it can run off a tiny Adafruit Trinket or Digispark.  Second, the buttons are a little difficult for my youngest daughter to press.
    2. Using an IR receiver sensor, I could use a small IR remote to control the robot – which would be great.  Or, I could possibly even use an old remote control from a TV or VCR.12345
  3. Changes to Y Axis.  The Y-axis tends to “droop” when it is fully extended.  If the underside was slightly longer, it could just have a plastic runner that would keep it level.
  4. Changes to Z Axis.  The current Z-axis sucks.  It is very wobbly and not able to hold a pen very well.  If it had a sliding slot/notch system like the XY axes do, it might not be as bad.
  5. Changes to X Pinion/Gear.  If this were very slightly thinner, I wouldn’t have to raise the X rack slightly off the drawing surface.  Or, of course, I could make the X rack slightly taller.
  1. That’s a “video cassette recorder.” []
  2. That’s like a DVD that you have to rewind at top speed before you can watch it again – and where the quality degrades slightly every time you watch it []
  3. Oh.  Sure.  Yes.  A DVD is like a Blu-Ray, only it doesn’t look quite as good on your TV. []
  4. Blu-Ray?  Yeah, okay.  That’s…  like… if you had a coaster that could only stream just one movie off Netflix if you stick into a box next to your TV []
  5. TV?!  Seriously?!  Okay, okay.  It’s like a really big phone that can’t make calls or text. []

Drawing By Numbers

Draw on the go with a small Arduino-powered CNC robot!

Draw by numbers!  Plus the pound and star keys, if you want.

In preparation for Benicia Mini Maker Faire 2016 this last weekend I finally got my TinyCNC working with this sweet Adafruit numeric keypad!  Now using the robot is so easy, even a 17-month old can operate it!1

I’ve programmed the ‘bot to interpret to move as follows:

  • 4 = Left
  • 6 = Right
  • 2 = Back
  • 8 = Forward
  • 5 = Up
  • 0 = Down

I believe the directional keys move the ‘bot in 3mm increments, but this is easily adjusted in the code to whatever you prefer.  I’ve also set the 1, 3, 7, and 9 keys to move in the four combinations of X / Y max / min travel.2

Print a TinyCNC for yourself by getting the STL’s on Thingiverse.  Also, I’m still getting the hang of this whole GitHub thing, but if you have a similar keypad and want to give the Arduino sketch a shot, check it out here.  You’ll want the one entitled, “TinyCNC Keypad.”

  1. My younger daughter has really gotten a kick out of the ‘bot – a tiny robot she can actually control all by herself. []
  2. My daughter enjoys these four buttons the most – since they cause the most dramatic change in the ‘bot. []