BioShock Big Daddy

bioshock-22x24

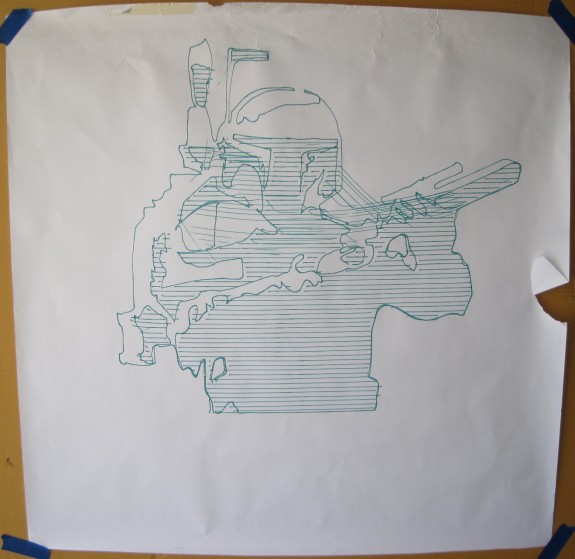
Bioshock Big Daddy, brown Sharpie on banner paper, 22″ tall by 24″ wide

This drawing of the “Big Daddy” cyborg from the video game BioShock was drawn by robot with a brown Sharpie on banner paper, 22″ tall by 24″ wide.  The dimensions refer to the drawing, not the sheet of paper.  The drawing took about four hours to complete.

Although I never played System Shock or BioShock, I appreciated the artwork and badass robots that appeared in the game.  I had a feeling others would enjoy it to, and I’m glad to report I was right.  There were a lot of people who instantly recognized the drawing long before it was complete.  I chose the brown because the original robot was a dull oxidized bronze color in the video game.  The drawing was converted from a bitmap image to scalable vector graphic using the same process as with the Iron Man drawing – separating the drawing into several colors, each in their own layer, and then having the robot draw the outline of each layer rather than shading them.  Shading the layers of the drawing would have taken a lot longer and possibly been messier.  Unlike the Iron Man drawing, the robot managed to draw each layer pretty much perfectly.

Of the various complex drawings created at Maker Faire 2014, this one probably came out the best overall.

Iron Man Armor

ironman-20x29

Iron Man Armor, green Sharpie on banner paper, 20″ tall by 29″ wide

This drawing of Iron Man, in green Sharpie on banner paper, was created at Maker Faire Bay Area 2014.  The finished drawing is 20″ tall by 29″ wide, nearly the entire width of the roll of paper.  The dimension refer to the drawing, not the sheet of paper.  The drawing took about four hours to complete.

I happened upon the picture of Iron Man from a SEGA video game while searching for something to draw.  I chose green for the drawing because, frankly, it was almost all I had left by the end of Maker Faire weekend.  As with several other drawings, I fiddled with the Inkscape “Trace Bitmap” function until I got a result I felt would come out nicely.  Rather than reducing the entire drawing to black and white shapes, as I did with the Serenity picture, I instructed the program to separate the drawing into several different colors, each in their own layer. Rather than shading each layer differently, as I did with the Fakegrimlock picture, I opted to just have the robot trace out each layer.

The result is that those areas of the drawing that are more “highlighted” are outlined concentrically several times.  There is some variation between each layer, which I would attribute to the servo cable getting caught on the edge of the paper or board while drawing.  Even so, I’m very happy with the result.

Serenity Firefly class ship and quote

serenity-15x28

Serenity, Firefly class ship, brown Sharpie on banner paper, 15″ tall by 28″ wide

This drawing was created at Maker Faire Bay Area 2014.  This is a drawing of the Firefly class star ship “Serenity” from the television show “Firefly,” drawn in brown Sharpie on banner paper, 15″ tall by 28″ wide.  The dimensions refer to the drawing, not the sheet of paper.  This drawing took about an hour and a half to complete.

While this was probably the simplest and quickest of all of the drawings from that weekend, it is probably my favorite.  In honor of the ill-fated Browncoats, I chose a brown Sharpie for the drawing.  I had to fiddle mightily with Inkscape’s Trace Bitmap settings to turn the speckley drawing of the leaf, quote, and cutout of Serenity into a black and white picture.  As I worked to transform the drawing into a scalable vector graphic, I had to repair several of the letters to remain legible.

You may notice the misaligned “f” in “leaf” in the drawing.  This misalignment doesn’t appear in the SVG file, but did appear in the Polargraph control software I used to create the file to be drawn.  At first I was going to re-align the letter – then I decided I liked the chaotic implication of this one misplaced character.  To me it suggests the disarray surrounding the moments in the film when the quote was uttered, as well as the sudden but inevitable Wheedon-esque betrayal that followed.

This was one of final drawings of Maker Faire 2014.

Star Wars Boba Fett

bobafett-20x22

Star Wars Boba Fett, green Sharpie on banner paper, 20″ tall by 22″ wide, a little worse for wear

This robot drawing of Boba Fett is in pretty sorry shape after Maker Faire Bay Area 2014.  Green Sharpie on banner paper, 20″ tall by 22″ wide, the dimensions refer to the drawing, not the sheet of paper.  It took about three hours – mostly due to the hatching1 I added to shade parts of the drawing.

To create the drawing I used Inkscape’s “Trace Bitmap” function on an altered picture of Boba Fett I found on the internet.  It can help to “posterize” an image in GIMP before trying to “Trace Bitmap” in Inkscape.  This also allows a little more control over the shading and various regions.  Just as with the 100 Acre Woods drawing, the pen slipped out slightly in the pen holder, causing the some sweeping arcs to appear across the middle of the image.  Unlike that other drawing, they don’t appear to detract as much here.

Once drawn, I taped this picture to the cloth over the table at the front of the booth.  What I didn’t realize is that every child who walked up would pick at the tape and kick the bottom of the drawing with their feet.  While the central drawing is relatively untouched, it does suffer from the cosmetic default caused by the pen slippage.  Although it’s pretty obvious from the photograph above, the paper is actually torn at the right hand side and there is still some masking tape at the top left of the paper.

  1. Using the awesome Eggbot Inkscape plugin []

Harry Potter Hogwarts Crest

hogwarts-25x20

Harry Potter Hogwarts Crest poster, blue Sharpie on banner paper, 25″ tall x 20″ wide

At this year’s Maker Faire Bay Area 2014 all of my robot drawings were done with the use of the pen lift mechanism.  This allowed me to create big awesome pictures in less time than it would have taken by using single line drawing techniques.  Although less ink is used, the use of the pen lift mechanism introduces a delay between each line.  This drawing of the Harry Potter Hogwarts Crest by Jmh20 took about two hours to finish.  The drawing is blue Sharpie on banner paper, 25″ tall x 20″ wide.  The dimensions refer to the drawing, not the sheet of paper.  

Drawing from scalable vector graphic formats sometimes takes a bit of extra setup.  In the case of this image, I removed several of the layers from the image.  The reason for deleting layers is that the robot will draw every edge of every layer – including those that mostly overlap with others.  This is why the raven’s wing and lion’s claw can be seen through the center of the crest.  Most of what I eliminated consisted of extra outlines.

This was the very last drawing I completed at Maker Faire Bay Area 2014.

Doctor Who “To Victory” Dalek Poster

Doctor Who "To Victory" Dalek poster, red Sharpie on banner paper, 28" tall x 23" wide

Doctor Who “To Victory” Dalek poster, red Sharpie on banner paper, 28″ tall x 23″ wide

Another robot drawing from exhibiting at Maker Faire Bay Area 2013.  This is the result of my PlotterBot drawing a cropped version of the “To Victory” Dalek poster on the BBC website which was released with the “Victory of the Daleks” episode from 2010.  ((Those faithful readers of my blog posts may recall my other attempt to memorialize this same drawing))  This drawing is red Sharpie on banner paper, 28″ tall x 23″ wide.  The dimensions refer to the drawing, not the sheet of paper.  This drawing took about eight hours.

Unfortunately, this drawing was longer than the sheet of paper I had allocated for it.  You can see at the bottom of the drawing a white uncolored patch where the blue tape was covering the edge of the paper.  However, if you can get over that defect, this is still a cool poster – and the biggest drawing I had ever done up to that point.

Since this drawing was posted on the fence at Maker Faire 2013, rolled up, archived, unrolled, transported to Maker Faire 2014 where it was displayed again, you can see a little wrinkling of the paper at the edges.  As you can also see, the drawing went off the edge of the paper.

Game of Thrones House Stark Dire Wolf

housestark-20x28

Game of Thrones House Stark Dire Wolf, red Sharpie on banner paper, 20″ tall x 28″ wide

This is one of my robot drawings from exhibiting at Maker Faire Bay Area 2013.  It is a robotic interpretation of the excellent “metallic Game of Thrones wallpaper” by Sasha Vinogradova.  This drawing is red Sharpie on banner paper, 20″ tall x 28″ wide.  The dimensions refer to the drawing, not the sheet of paper.  This drawing took about five hours.

I don’t remember why I chose red for this drawing, but this is another instance where I particularly like the effect of a large “blood red” mark at the end of the drawing.  I feel like it balances the negative space and leave a slight ominous tone. This is another wide drawing, though a little off center.  If I were to do this drawing over again, I would probably make it smaller.

Since this drawing was posted on the fence at Maker Faire 2013, rolled up, archived, unrolled, transported to Maker Faire 2014 where it was displayed again, you can see a little wrinkling of the paper at the edges.

Breaking Bad’s Walter White

Breaking Bad's Walter White, blue Sharpie on banner paper, 14" tall x 29" wide

Breaking Bad’s Walter White, blue Sharpie on banner paper, 14″ tall x 29″ wide

This is one of my drawings from exhibiting at Maker Faire Bay Area 2013.  It features Breaking Bad’s Walter White sitting in a warehouse surrounded by bricks of cash.  The drawing is blue Sharpie on banner paper, 14″ tall x 29″ wide.  The drawing took about five hours to complete, because of all of the dark areas.

I chose the blue Sharpie for this drawing to echo the series’ famous “blue meth.”  I think it would have looked equally good in green1 or yellow.2  This one of my wider drawings – very nearly to the edge of each side of the sheet of paper, which is fairly difficult to do.  Since this drawing was started at the top left corner3 I couldn’t have been positive it would have finished within the left edge of the paper.  You can also see a dark spot at the bottom left where the pen soaked into the drawing for a bit before I picked up the pen.  Depending upon the drawing, I actually like this effect.

Since this drawing was posted on the fence at Maker Faire 2013, rolled up, archived, unrolled, transported to Maker Faire 2014 where it was displayed again, you can see a little wrinkling of the paper at the edges.

  1. Greed, envy, cash []
  2. To call out the yellow hazard suit []
  3. You can see how the drawing is darker at the top right, lighter at the bottom left []