BioShock Big Daddy

bioshock-22x24

Bioshock Big Daddy, brown Sharpie on banner paper, 22″ tall by 24″ wide

This drawing of the “Big Daddy” cyborg from the video game BioShock was drawn by robot with a brown Sharpie on banner paper, 22″ tall by 24″ wide.  The dimensions refer to the drawing, not the sheet of paper.  The drawing took about four hours to complete.

Although I never played System Shock or BioShock, I appreciated the artwork and badass robots that appeared in the game.  I had a feeling others would enjoy it to, and I’m glad to report I was right.  There were a lot of people who instantly recognized the drawing long before it was complete.  I chose the brown because the original robot was a dull oxidized bronze color in the video game.  The drawing was converted from a bitmap image to scalable vector graphic using the same process as with the Iron Man drawing – separating the drawing into several colors, each in their own layer, and then having the robot draw the outline of each layer rather than shading them.  Shading the layers of the drawing would have taken a lot longer and possibly been messier.  Unlike the Iron Man drawing, the robot managed to draw each layer pretty much perfectly.

Of the various complex drawings created at Maker Faire 2014, this one probably came out the best overall.

Iron Man Armor

ironman-20x29

Iron Man Armor, green Sharpie on banner paper, 20″ tall by 29″ wide

This drawing of Iron Man, in green Sharpie on banner paper, was created at Maker Faire Bay Area 2014.  The finished drawing is 20″ tall by 29″ wide, nearly the entire width of the roll of paper.  The dimension refer to the drawing, not the sheet of paper.  The drawing took about four hours to complete.

I happened upon the picture of Iron Man from a SEGA video game while searching for something to draw.  I chose green for the drawing because, frankly, it was almost all I had left by the end of Maker Faire weekend.  As with several other drawings, I fiddled with the Inkscape “Trace Bitmap” function until I got a result I felt would come out nicely.  Rather than reducing the entire drawing to black and white shapes, as I did with the Serenity picture, I instructed the program to separate the drawing into several different colors, each in their own layer. Rather than shading each layer differently, as I did with the Fakegrimlock picture, I opted to just have the robot trace out each layer.

The result is that those areas of the drawing that are more “highlighted” are outlined concentrically several times.  There is some variation between each layer, which I would attribute to the servo cable getting caught on the edge of the paper or board while drawing.  Even so, I’m very happy with the result.

Serenity Firefly class ship and quote

serenity-15x28

Serenity, Firefly class ship, brown Sharpie on banner paper, 15″ tall by 28″ wide

This drawing was created at Maker Faire Bay Area 2014.  This is a drawing of the Firefly class star ship “Serenity” from the television show “Firefly,” drawn in brown Sharpie on banner paper, 15″ tall by 28″ wide.  The dimensions refer to the drawing, not the sheet of paper.  This drawing took about an hour and a half to complete.

While this was probably the simplest and quickest of all of the drawings from that weekend, it is probably my favorite.  In honor of the ill-fated Browncoats, I chose a brown Sharpie for the drawing.  I had to fiddle mightily with Inkscape’s Trace Bitmap settings to turn the speckley drawing of the leaf, quote, and cutout of Serenity into a black and white picture.  As I worked to transform the drawing into a scalable vector graphic, I had to repair several of the letters to remain legible.

You may notice the misaligned “f” in “leaf” in the drawing.  This misalignment doesn’t appear in the SVG file, but did appear in the Polargraph control software I used to create the file to be drawn.  At first I was going to re-align the letter – then I decided I liked the chaotic implication of this one misplaced character.  To me it suggests the disarray surrounding the moments in the film when the quote was uttered, as well as the sudden but inevitable Wheedon-esque betrayal that followed.

This was one of final drawings of Maker Faire 2014.

Fake Grimlock Because Awesome

fakegrimlock-23x17

Fake Grimlock, green Sharpie on banner paper, 23″ tall by 17″ wide

This drawing of Fakegrimlock ((Twitter sensation and lean startup robot dinosaur)) being awesome is green Sharpie on banner paper, 23″ tall x 17″ wide.  The dimensions refer to the drawing, not the sheet of paper.  This drawing took about four hours to finish.

This is something I’ve wanted to draw for a while now – Fakegrimlock’s “Because Awesome” sketch.  I particularly enjoy Fakegrimlocks’ drawing style – simple evocative drawings with just a few words.  Angry chickens, militant mice, big damn robot dinosaurs.  As with the Boba Fett, I used the Inkscape Eggbot extension to add hatching to the drawing.  In tracing the original bitmap drawing in Inkscape, I managed to separate it into three different colors – the person (lightest), the robot dinosaur and words (darkest), and the flames (medium).  From there I added hatching to the flame layer and a tighter hatching to the dinosaur robot and words.  The penlifts on this drawing weren’t as tight as some of my other pictures, but I actually like the way it comes out.

I like to think Fakegrimlock would approve.  Or, at least, not eat me.

The drawing has a slight crease to the right bottom quadrant.  Otherwise, it’s pretty much just awesome.

Star Wars Boba Fett

bobafett-20x22

Star Wars Boba Fett, green Sharpie on banner paper, 20″ tall by 22″ wide, a little worse for wear

This robot drawing of Boba Fett is in pretty sorry shape after Maker Faire Bay Area 2014.  Green Sharpie on banner paper, 20″ tall by 22″ wide, the dimensions refer to the drawing, not the sheet of paper.  It took about three hours – mostly due to the hatching1 I added to shade parts of the drawing.

To create the drawing I used Inkscape’s “Trace Bitmap” function on an altered picture of Boba Fett I found on the internet.  It can help to “posterize” an image in GIMP before trying to “Trace Bitmap” in Inkscape.  This also allows a little more control over the shading and various regions.  Just as with the 100 Acre Woods drawing, the pen slipped out slightly in the pen holder, causing the some sweeping arcs to appear across the middle of the image.  Unlike that other drawing, they don’t appear to detract as much here.

Once drawn, I taped this picture to the cloth over the table at the front of the booth.  What I didn’t realize is that every child who walked up would pick at the tape and kick the bottom of the drawing with their feet.  While the central drawing is relatively untouched, it does suffer from the cosmetic default caused by the pen slippage.  Although it’s pretty obvious from the photograph above, the paper is actually torn at the right hand side and there is still some masking tape at the top left of the paper.

  1. Using the awesome Eggbot Inkscape plugin []

100 Acre Woods from Winnie the Pooh

100acre-18x25

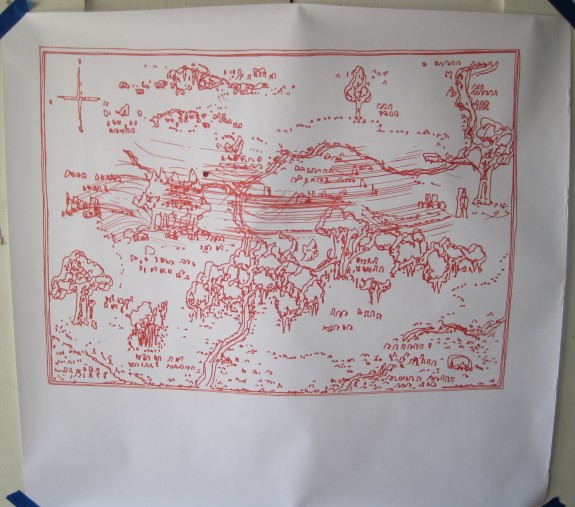
100 Acre Woods map from Winnie the Pooh, orange Sharpie on banner paper, 18″ tall x 25″ wide

This drawing of the Winnie the Pooh 100 Acre Woods map is orange Sharpie on banner paper, 18″ tall x 25″ wide.  The dimensions refer to the drawing, not the sheet of paper.  This drawing took about six hours to finish.

This isn’t my first attempt to convert images of the 100 Acre Woods map into a SVG file that could be drawn by a robot.  The last time I tried this was more than three years ago using my MakerBot Cupcake Unicorn pen plotter attachment.  This drawing is considerably larger than the 3″ square size available on a sticky note.

I really wanted to use my PlotterBot to draw a map this year.  This wasn’t really an option last year since I didn’t have the pen lift mechanism working yet.  A map tends to be rectangular, requiring the robot to be well centered, and have a lot of diverse details which would highlight the pen lifting abilities of the robot.  Plus, nice maps tend to be large – which suits my robot just fine.

I chose orange for the drawing as it seemed a fitting reflection of Pooh’s own coloring while lending a hint of “old timey map” as well.  There are two defects to the drawing which I feel obligated to disclose.  First, the reason for the defects.  Since these drawings take so very long, it’s hard to gauge when they’ll finish.  In the case of this drawing, I set it to draw over Saturday night since I knew it would take a really long time.  As I wasn’t even at the fair when the drawing finished overnight, the drawing ended with an inkblot in the top left quadrant.  Although this is an interesting, and sometimes even enhancing, consequence in some drawings, I don’t find it contributes much in this case.  You’ll also notice some curvey “stripes” across the middle of the drawing.  These are the result of the pen slipping out slightly in the pen holder, so that the pen lift mechanism didn’t completely lift the pen off the paper.

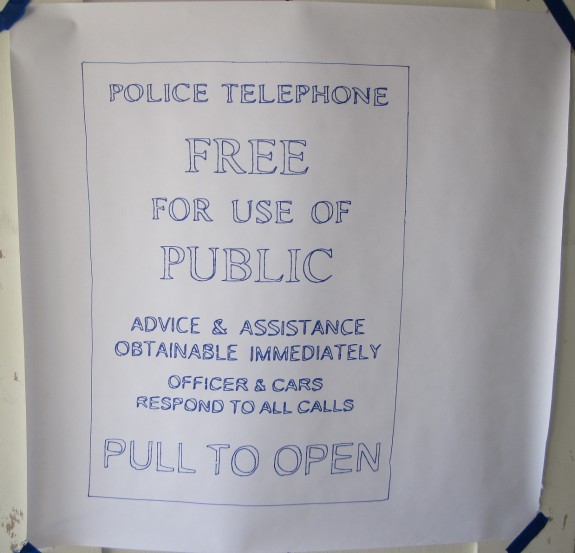
Setting aside the defects, the drawing is mostly without the skew evident in the police box sign drawing and the pen lifts elsewhere in the drawing are clear and clean.  I also found that I could run my robot fairly quickly, with the speed and acceleration cranked all the way up to 1000.  One particularly interesting and enjoyable part of the drawing was getting to watch it.  Unlike the “zig zaggy” pixelated style from my drawings last year, when drawing Inkscape files, the Polargraph software directs the robot to draw all the lowest points first and works its way upwards.  While this isn’t the most efficient path, the result is the observer (or visitors to the booth) gets to watch the little pen holder work on a spot then zip over to the other side of the drawing.

The sheet of paper has some slight wrinkling to the edges – probably caused by rolling and transporting the paper.

Doctor Who TARDIS Police Box Sign

policebox-23x17

Doctor Who TARDIS Police Box sign poster, blue Sharpie on banner paper, 23″ tall x 17″ wide

Another robot drawing from Maker Faire Bay Area 2014 with the use of the pen lift mechanism.  The drawing is blue Sharpie on banner paper, 23″ tall x 17″ wide.  The dimensions refer to the drawing, not the sheet of paper.  This drawing of the Doctor Who TARDIS police box sign took about two hours to finish.

Although the drawing is slightly skewed, which was caused by apparently starting the drawing from slightly off of the expected home point, I’m rather happy with this one.  I guess my personal metric for whether I’m happy with a drawing is whether the final result is immediately recognizable as the thing it is supposed to be.  The pen lifts and pen drops were very clean – resulting in (mostly) complete shapes.  You’ll notice the “T” in “PULL TO OPEN” has a gap between the pen drop and lift.  Although it might look like the “T” also suffers from a lack of straight lines, that isn’t necessarily the fault of the robot.  The drawing was created by using Inkscape’s “Trace Bitmap” function to detect the outlines from a picture of a police box sign – so the lack of perfectly straight lines might very well have been a result of Inkscape’s interpretation of a bitmap drawing.1

This was the second to last drawing the robot and I created at Maker Faire Bay Area 2014.

  1. I blame Inkscape, but I chose the settings it used. []

Harry Potter Hogwarts Crest

hogwarts-25x20

Harry Potter Hogwarts Crest poster, blue Sharpie on banner paper, 25″ tall x 20″ wide

At this year’s Maker Faire Bay Area 2014 all of my robot drawings were done with the use of the pen lift mechanism.  This allowed me to create big awesome pictures in less time than it would have taken by using single line drawing techniques.  Although less ink is used, the use of the pen lift mechanism introduces a delay between each line.  This drawing of the Harry Potter Hogwarts Crest by Jmh20 took about two hours to finish.  The drawing is blue Sharpie on banner paper, 25″ tall x 20″ wide.  The dimensions refer to the drawing, not the sheet of paper.  

Drawing from scalable vector graphic formats sometimes takes a bit of extra setup.  In the case of this image, I removed several of the layers from the image.  The reason for deleting layers is that the robot will draw every edge of every layer – including those that mostly overlap with others.  This is why the raven’s wing and lion’s claw can be seen through the center of the crest.  Most of what I eliminated consisted of extra outlines.

This was the very last drawing I completed at Maker Faire Bay Area 2014.

Setting up at Maker Faire Bay Area 2014

PlotterBot - packed up and ready to go

PlotterBot – packed up and ready to go

One of the things I appreciate most about the design of my PlotterBot is that it is extremely modular and portable.  All of the parts have been designed so that the entire robot can be assembled and disassembled with a single 3mm hex wrench.  Pictured above is everything I need to setup the robot and spend all weekend drawing – the tools, hardware, replacement parts, extra tape, paper, and pens.1  Best of all, all this stuff fits neatly into my car’s trunk.  The robot underneath in the “well” of the truck, with the large pieces of plywood on top.

I took pictures from the same standpoint as I set up the booth.

This slideshow requires JavaScript.

Or, if you prefer, here’s an animated GIF of the setup.  🙂

Maker Faire Bay Area 2014 Setup

Maker Faire Bay Area 2014 Setup

  1. If only I had remembered the metric ruler! []

Bay Area Maker Faire 2013 Drawings

This slideshow requires JavaScript.

I’ve been meaning to share these drawings from Maker Faire Bay Area 2013 for more than a year now.  As I was reinstalling my PlotterBot to its original home on our living room wall I figured this was a good time to take pictures of these drawings to share.  I’ve also added a quick blog post to go with each of these drawings, to add a bit more background.  Here are the links to the Doctor Who dalek poster, Game of Thrones House Stark dire wolf poster, and Breaking Bad’s Walter White poster.

At last year’s Maker Faire my PlotterBot did not have a functional pen lift mechanism.  I had designed a pen holder with this ability in mind, but I still hadn’t actually tried it out.  In fact, it wasn’t until about two weeks after Maker Faire that I actually got a reliable pen lift working.  One of the great things about these “single line super pixelated drawings” is that they’re big and bold.  I also really like the abstract nature of this drawing style and how it promotes appreciating the works from a distance.  The downside to them is that they take a really long time and basically use up an entire pen with each drawing.

I had several other drawings on display back in 2013 – including a traveling salesman problem style Death Star, Yoda, and Nikola Tesla portrait.  This last one I gave to Joey Hurdy when he stopped by the booth just after Maker Faire ended on Sunday.