Drawing By Numbers

Draw on the go with a small Arduino-powered CNC robot!

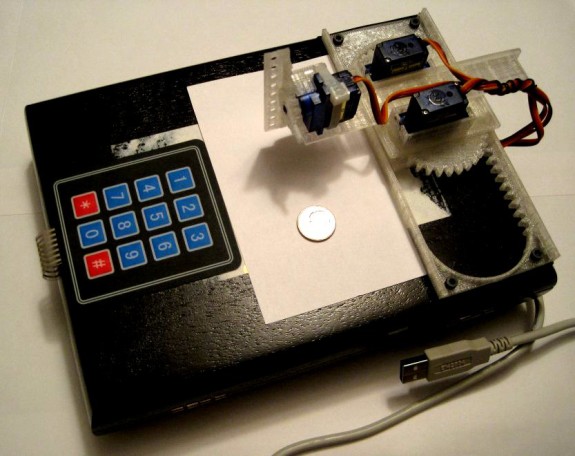
Draw by numbers!  Plus the pound and star keys, if you want.

In preparation for Benicia Mini Maker Faire 2016 this last weekend I finally got my TinyCNC working with this sweet Adafruit numeric keypad!  Now using the robot is so easy, even a 17-month old can operate it!1

I’ve programmed the ‘bot to interpret to move as follows:

  • 4 = Left
  • 6 = Right
  • 2 = Back
  • 8 = Forward
  • 5 = Up
  • 0 = Down

I believe the directional keys move the ‘bot in 3mm increments, but this is easily adjusted in the code to whatever you prefer.  I’ve also set the 1, 3, 7, and 9 keys to move in the four combinations of X / Y max / min travel.2

Print a TinyCNC for yourself by getting the STL’s on Thingiverse.  Also, I’m still getting the hang of this whole GitHub thing, but if you have a similar keypad and want to give the Arduino sketch a shot, check it out here.  You’ll want the one entitled, “TinyCNC Keypad.”

  1. My younger daughter has really gotten a kick out of the ‘bot – a tiny robot she can actually control all by herself. []
  2. My daughter enjoys these four buttons the most – since they cause the most dramatic change in the ‘bot. []

Drawing Robot In A Box

Draw on the go with a small Arduino-powered CNC robot!

Draw on the go with a small Arduino-powered CNC robot!

Well, technically, ON a box.

The wiring is really simple.  A small breadboard is used connect Arduino pins 10, 11, 12, power and ground to the three servos.  The keypad is wired directly to pins 2 – 8 on the Arduino.  That’s it.

Wait... that's all there is to it?!?

Wait… that’s all there is to it?!?

Of course, it doesn’t work.  Yet.  🙂

Maker Faire Bay Area 2015!!!

Join me at Maker Faire 2015!!!

Join me at Maker Faire 2015!!!

Maker Faire Bay Area 2015 is just a few days away!  I hope you’re as excited as I am!

I’ve made some minor improvements to my large drawing robot and am going to bring a tiny drawing robot as well.  The changes to the big drawing robot are:

  1. “Feet” for Underside of Project Box
    1. My robot is built into a shallow wooden box.  On the top of that wooden box there is a “holder” for a roll of paper.  By adding little “feet,” as short as 1/8 inch or so, to the underside of the project box, the box no longer pushes against the roll of paper – which makes it easier to pull paper down when drawing.
  2. Revisions to Paper Roll Holder
    1. As it is, the paper roll holder is a little close to the project box, so the paper sometimes bumps against it.  This isn’t much of a problem, but one that can be eliminated easily.
    2. A notch in the top of the paper roll holder.  This way, rather than having to dismantle the robot, I can just lift the old paper roll out and drop in a new one.
  3. Batteries for Pen Holder
    1. The pen holder uses AA batteries, not for power, but for dead weight.  Right now the batteries are held in place by hot glue.  I would rather there was a slot on the holder for actually holding the batteries.

And, for those of you interested in seeing more of my TinyCNC, I’ll be bringing that too!  I’ve been working on a little something there as well.  Here’s what I’ve done:

  1. Mounted TinyCNC
    1. On a cigar box!  The TinyCNC is bolted to the top of a cigar box kindly donated by a local smoke shop.  A small solderless breadboard and Arduino now live inside the cigar box as well.
  2. Trying out New Interface
    1. I tried using the TinyCNC at first with an Arduino, feeding it Gcode-like commands over the serial interface.  Then I tried saving designs as coordinates and flashing an Adafruit Trinket with the coordinates and drawing that.  Since the Trinket doesn’t have a serial connection, this meant I lost a lot of the functionality of the tiny robot.
    2. This time I’m using a membrane 3×4 matrixed keypad to control the robot.  The keypad is also mounted to the cigar box.
  3. Trying out New Code
    1. I can get the Arduino to recognize keypresses reliably, but I can’t get the ‘bot to move in response… yet.  🙂  Heck, I still have almost 36 hours until showtime, which is plenty of time.  So far, it does absolutely nothing at all – except shudder.  I’m not that worried about it though, I can always go back to an older version of the Arduino sketch.

As far as actually showing a working demonstration of the TinyCNC, I have a few ideas.  Here’s what I’d like to show off, in descending order:

  1. Tiny robot, controlled by a numeric keypad, letting people draw on pieces of paper and take them home.
  2. Tiny robot, with several pre-programmed designs, letting people hit a number on a keypad, having it draw a pre-programmed design, and taking the piece of paper home.
  3. Tiny robot with a single push button mounted on box, which draws a single pre-programmed design when pressed, people take the piece of paper home.
  4. Tiny robot, connected to my laptop, drawing things sent from the laptop, and let people take a piece of paper with the drawing home.

What will be ready by Friday afternoon?  I have no idea!!!  You can either stop by and see for yourself or tune in on Monday night when I post a recap of the weekend.

Drawing robot supplies shopping list

Going Shopping

Going Shopping

Sometimes it can be difficult to figure out where to get started on a project.1 Once you’ve read through the build instructions, you’re going to need to get your hands on some parts.  I’ve provided a “shopping list” of sorts below:2

I’ve got more to say about each of these fantastic suppliers, but that is another post in and of itself.  Feel free to shoot me an email or leave a comment if you just can’t wait.

  1. Photo courtesy of polycart []
  2. No kickbacks, just a happy customer from each of these suppliers []

Piccolo files and information available!

The small robot from Diatom Studios called the Piccolo was the inspiration for my own TinyCNC.  The Piccolo was first announced in February of 2012, but Diatom Studios just released a new video of their robot with lots more details.  They’ve also released all the source under Creative Commons, so you can track down their source files on Github and follow their excellent building guides to create your own.

New Piccolo video:

Older Piccolo video:

Vertical Pen Test by Jens Clarholm

Vertical Pen Test by Jens Clarholm

Vertical Pen Test by Jens Clarholm

Jens Clarholm has been hard at work to find the best pen for his Circlon1 drawing machine.  The Circlon holds pens vertically as it draws, which necessitates pens that draw quickly and smoothly.  

You should definitely check out Jens’ detailed and thoughtful review.  For the sake of posterity, the winners were Pentel Energel Deluxe RTX and the Pilot G-2 07.

If you need to find the best horizontal pen for a drawing robot, you may find my review from last year helpful.

  1. Spirograph-style []

Dalek Blueprints

dalekblueprints

Dalek Inverse Blueprints, purple Sharpie on banner paper

One fun thing I like to do at Maker Faire is give away some of my drawings.  I gave away two Star Wars themed drawings (the Death Star and Yoda) , a Calvin & Hobbes, and the dalek blueprints picture above.  When I started drafting the blog posts documenting Maker Faire 2014 I was bummed to discover that I never took a picture of the dalek blueprints drawing!  So, you can imagine my surprise to discover that the Hackaday interview yesterday showed my robot drawing the very same daleks!

As I mentioned earlier, I’m really looking forward to re-drawing this one only larger.

Maker Faire Bay Area 2014 Drawings

This slideshow requires JavaScript.

If you missed the PlotterBot exhibit at Maker Faire Bay Area 2014, I’ve got you covered.  Above are most of the drawings that were on display at my booth.  A few of the drawings from 2013 were also on display.

This year I had the pen lift mechanism working and wanted to draw things that not only highlighted the robot’s ability, but that people would find recognizable and enjoyable.  One of the best parts about drawing from SVG files, rather than high pixelated bitmap drawings as I did the year prior, is that it is much more entertaining to watch.  When the robot is working its way in big arcs across a sheet of paper, the rocking movement of the pen holder is almost imperceptible from a distance.  When drawing from an SVG file with lots of discrete regions, the robot will draw the lowest points first and work its way upwards.  Although this can lead to an extremely inefficient path, the result is that the robot will tend to do a small speck in one area, then zoom to another region of the drawing, then back again.

While drawing SVG files can be relatively quick, a simple drawing taking only about two hours, the delays caused by performing pen lifts and pen drops and zipping between locations can make a drawing take several hours longer than one would anticipate.  If the drawing includes shaded regions, it can take even longer.

There are several drawings which are, unfortunately, not pictured on this website – because I gave them away.  One drawing, blueprints for a dalek in purple Sharpie, I gave away before I remembered to take a picture.  A young gal, dressed as the eleventh Doctor, had stopped by the booth several times to fawn over the drawing.  As it was the end of the fair, I just gave it away.  I’m pretty sure it made her day.  This is one drawing I look forward to doing again – this time even larger.  Since it was drawn right-side up, it could only be drawn 30″ wide – the width of my paper roll.  If I were to do it again, I would draw it on its side so it could be much much larger.

The last two drawings were for friends of mine were in need of banners for their booths.  But, these are stories for another blog post.