Maker Faire 2016 Drawing Robot Presentation Slides

Maker Faire Bay Area 2016 was a wild ride!  If you were able to come to my presentation on tiny drawing robots – thank you!  If you weren’t able to make it, I’m sorry I missed you.  I got to see some old friends1 and make some new ones2 , which is probably the biggest reason I blog and exhibit and present at Maker Faire.

Admittedly, I was a concerned that I would be talking to a bunch of empty benches, that I would run through all of my slides in the first five of my allotted 25 minutes, or that I would be presenting to a completely silent crowd.  If you came to the presentation, you got to see that none of those things happened.  I started talking to the crowd a little early, answering some questions and letting people try out my demonstration robot with the keypad.  When I actually started the presentation the benches were full and there were several people standing around them.  There were some really great questions from the audience and lots of enthusiastic ideas.

If you didn’t come to the presentation, you missed both of my daughters making impromptu appearances, one uncooperative robot, one cooperative robot, and you had the chance to grab a “maker card” and actually use my demonstration robot.

As promised, I’ve posted my slides (above) so you can relive the magic.

  1. Like you Kongorilla! []
  2. Like you Robert, Vanna, Elijah, and Matt []

Care and Feeding of Your TinyCNC Drawing Robot

Draw on the go with a small Arduino-powered CNC robot!

I’m bringing this fully assembled robot to Maker Faire on Sunday!

During my presentation at Maker Faire on Sunday I’ll be showing people how to build their very own TinyCNC drawing robot.  However, some things are best done in a written form – so you can refer back to the instructions while you work.

  1. Print these parts on a well-calibrated 3D printer
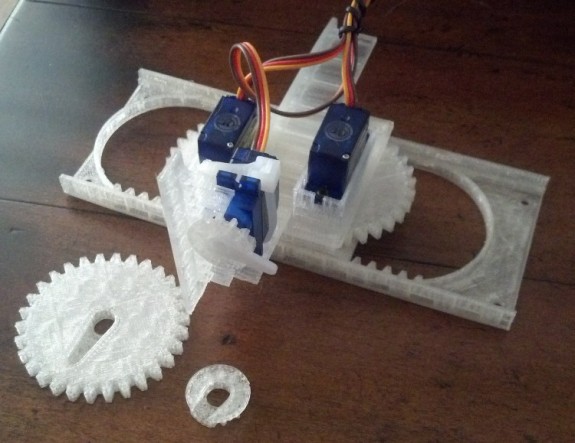
  2. Use the 8 plastic printed parts, 3 servo motors, and one zip tie to assemble the robot
  3. Wire the robot to your favorite microcontroller
  4. Program your microcontroller to make your robot do nifty things

Don’t let SkyNet win! Take this poll!

Do NOT let this happen!

I want to put some finishing touches on my TinyCNC drawing robot before Maker Faire, but I’m a little ambivalent about how best to show off it’s drawing/CNC abilities.1 There are several excellent ways to control such a robot – perhaps you can help me decide?  My thought is that an IR remote would be really nifty, since I could just hand the “control” to someone and they could play with the robot, getting it to draw something.  Then again, feeding gcode to the ‘bot and having it actually draw something semi-recognizable would also be great.2

What's the best way to control a TinyCNC / drawing robot?

View Results

Loading ... Loading ...

For context, here’s the links to the various possible ideas for control mechanisms:

Please vote above3 and let me know what you’d like to see working at Maker Faire!

  1. Photo by tenaciousme []
  2. Heck, the robots are small enough that I’ll probably bring more than one. []
  3. Or, comment below []

TinyCNC – Working Keypad UI

http://www.youtube.com/watch?v=PZx_6Dd0Dgw

If you’re still on the fence about trying to build your own drawing robot/plotterbot, take heart.  (Skip to the bottom of the post if you want to check out the latest 3D printable files and Arduino code.)  If a relative newbie such as myself can make a go of it, I’m pretty sure you can too.

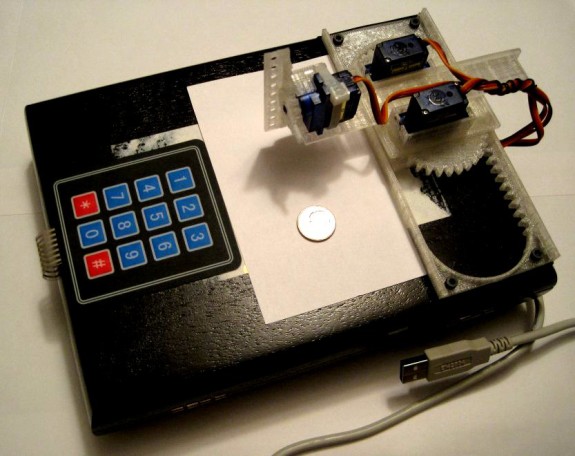
Last night1 I finally got the little ‘bot to really make use of the keypad as a modest user interface.  The robot is now using the USB cable purely for power purposes, rather than requiring the serial connection to the Arduino serial monitor as well drawing power from the USB port.  Now I can just connect the USB cable to a random USB charging device and operate the robot in a meaningful way by using the keypad.

In addition to the keypad direction system described in a previous post, now the “*” and “#” keys also have a usage.  The “*” key now starts and stops the Arduino from logging the inputs.2 Pressing the “#” key will play the most recently recorded inputs.

My record/playback system is super hacky and the ‘bot sometimes jitters before carrying out a command.  I’ll also have to implement a few additional changes to the design of Y axis before it can hold a pen reasonably stead.

But, it works!

Download the latest stable 3D printable parts on Thingiverse, latest Arduino sketch from Github, and play with one for yourself!

  1. Well, technically this morning? []
  2. If you forget whether it has been toggled to start or stop recording, the robot performs a little “wave” with the Z axis when it is ready to start recording and three little “waves” when it stops recording. []

TinyCNC: Too Many Ideas

ideas photo

Thinkin’ hard

I’ve been brainstorming ways to make the TinyCNC better:

  1. Drawing and Recording.
    1. My idea is to be able to control the robot through they keypad, perhaps going through the motions for a drawing or to perform a small task, and then have it “replay” the same motions.  Ideally, press the “*” key to start “recording,” draw something with the keypad, press “*” to stop recording, and then press the “#” button to replay the motions.  Could be nifty!
  2. Drawing by Remote Control.
    1. The Adafruit keypad I’m using is great!  There are only two, very minor, problems with it.  First, it requires 7 input pins, which means that I definitely need a full-fledged Arduino to run the robot, even though it can run off a tiny Adafruit Trinket or Digispark.  Second, the buttons are a little difficult for my youngest daughter to press.
    2. Using an IR receiver sensor, I could use a small IR remote to control the robot – which would be great.  Or, I could possibly even use an old remote control from a TV or VCR.12345
  3. Changes to Y Axis.  The Y-axis tends to “droop” when it is fully extended.  If the underside was slightly longer, it could just have a plastic runner that would keep it level.
  4. Changes to Z Axis.  The current Z-axis sucks.  It is very wobbly and not able to hold a pen very well.  If it had a sliding slot/notch system like the XY axes do, it might not be as bad.
  5. Changes to X Pinion/Gear.  If this were very slightly thinner, I wouldn’t have to raise the X rack slightly off the drawing surface.  Or, of course, I could make the X rack slightly taller.
  1. That’s a “video cassette recorder.” []
  2. That’s like a DVD that you have to rewind at top speed before you can watch it again – and where the quality degrades slightly every time you watch it []
  3. Oh.  Sure.  Yes.  A DVD is like a Blu-Ray, only it doesn’t look quite as good on your TV. []
  4. Blu-Ray?  Yeah, okay.  That’s…  like… if you had a coaster that could only stream just one movie off Netflix if you stick into a box next to your TV []
  5. TV?!  Seriously?!  Okay, okay.  It’s like a really big phone that can’t make calls or text. []

Drawing By Numbers

Draw on the go with a small Arduino-powered CNC robot!

Draw by numbers!  Plus the pound and star keys, if you want.

In preparation for Benicia Mini Maker Faire 2016 this last weekend I finally got my TinyCNC working with this sweet Adafruit numeric keypad!  Now using the robot is so easy, even a 17-month old can operate it!1

I’ve programmed the ‘bot to interpret to move as follows:

  • 4 = Left
  • 6 = Right
  • 2 = Back
  • 8 = Forward
  • 5 = Up
  • 0 = Down

I believe the directional keys move the ‘bot in 3mm increments, but this is easily adjusted in the code to whatever you prefer.  I’ve also set the 1, 3, 7, and 9 keys to move in the four combinations of X / Y max / min travel.2

Print a TinyCNC for yourself by getting the STL’s on Thingiverse.  Also, I’m still getting the hang of this whole GitHub thing, but if you have a similar keypad and want to give the Arduino sketch a shot, check it out here.  You’ll want the one entitled, “TinyCNC Keypad.”

  1. My younger daughter has really gotten a kick out of the ‘bot – a tiny robot she can actually control all by herself. []
  2. My daughter enjoys these four buttons the most – since they cause the most dramatic change in the ‘bot. []

Drawing Robot In A Box

Draw on the go with a small Arduino-powered CNC robot!

Draw on the go with a small Arduino-powered CNC robot!

Well, technically, ON a box.

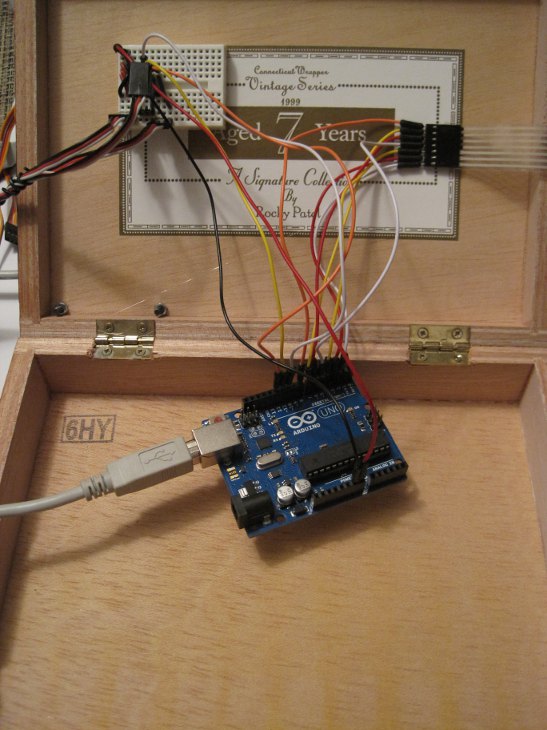
The wiring is really simple.  A small breadboard is used connect Arduino pins 10, 11, 12, power and ground to the three servos.  The keypad is wired directly to pins 2 – 8 on the Arduino.  That’s it.

Wait... that's all there is to it?!?

Wait… that’s all there is to it?!?

Of course, it doesn’t work.  Yet.  🙂

Maker Faire Bay Area 2015!!!

Join me at Maker Faire 2015!!!

Join me at Maker Faire 2015!!!

Maker Faire Bay Area 2015 is just a few days away!  I hope you’re as excited as I am!

I’ve made some minor improvements to my large drawing robot and am going to bring a tiny drawing robot as well.  The changes to the big drawing robot are:

  1. “Feet” for Underside of Project Box
    1. My robot is built into a shallow wooden box.  On the top of that wooden box there is a “holder” for a roll of paper.  By adding little “feet,” as short as 1/8 inch or so, to the underside of the project box, the box no longer pushes against the roll of paper – which makes it easier to pull paper down when drawing.
  2. Revisions to Paper Roll Holder
    1. As it is, the paper roll holder is a little close to the project box, so the paper sometimes bumps against it.  This isn’t much of a problem, but one that can be eliminated easily.
    2. A notch in the top of the paper roll holder.  This way, rather than having to dismantle the robot, I can just lift the old paper roll out and drop in a new one.
  3. Batteries for Pen Holder
    1. The pen holder uses AA batteries, not for power, but for dead weight.  Right now the batteries are held in place by hot glue.  I would rather there was a slot on the holder for actually holding the batteries.

And, for those of you interested in seeing more of my TinyCNC, I’ll be bringing that too!  I’ve been working on a little something there as well.  Here’s what I’ve done:

  1. Mounted TinyCNC
    1. On a cigar box!  The TinyCNC is bolted to the top of a cigar box kindly donated by a local smoke shop.  A small solderless breadboard and Arduino now live inside the cigar box as well.
  2. Trying out New Interface
    1. I tried using the TinyCNC at first with an Arduino, feeding it Gcode-like commands over the serial interface.  Then I tried saving designs as coordinates and flashing an Adafruit Trinket with the coordinates and drawing that.  Since the Trinket doesn’t have a serial connection, this meant I lost a lot of the functionality of the tiny robot.
    2. This time I’m using a membrane 3×4 matrixed keypad to control the robot.  The keypad is also mounted to the cigar box.
  3. Trying out New Code
    1. I can get the Arduino to recognize keypresses reliably, but I can’t get the ‘bot to move in response… yet.  🙂  Heck, I still have almost 36 hours until showtime, which is plenty of time.  So far, it does absolutely nothing at all – except shudder.  I’m not that worried about it though, I can always go back to an older version of the Arduino sketch.

As far as actually showing a working demonstration of the TinyCNC, I have a few ideas.  Here’s what I’d like to show off, in descending order:

  1. Tiny robot, controlled by a numeric keypad, letting people draw on pieces of paper and take them home.
  2. Tiny robot, with several pre-programmed designs, letting people hit a number on a keypad, having it draw a pre-programmed design, and taking the piece of paper home.
  3. Tiny robot with a single push button mounted on box, which draws a single pre-programmed design when pressed, people take the piece of paper home.
  4. Tiny robot, connected to my laptop, drawing things sent from the laptop, and let people take a piece of paper with the drawing home.

What will be ready by Friday afternoon?  I have no idea!!!  You can either stop by and see for yourself or tune in on Monday night when I post a recap of the weekend.

TinyCNC Two steps forward, one step back!

Intermediate version with minor design changes

Intermediate version with minor design changes

Above is a picture of the most recent version of this robot.  It includes two nifty changes and one design aspect1 that will probably involve me using design elements I had discarded earlier.  Here’s what I’m working on:

  1. No tools.
    1. The problem with using set screws to affix printed gears to the servos is that too little tightening means the gears will slip2 and too much tightening will strip the micro servo gears almost without warning.3 I’ve redesigned the pinions (gears) so that you can just push the servo horn through the gear and then push it onto the servo gear.  If you wish, for smoother and more reliable operation, you can always add the servo set screw to the servo horn, but it isn’t necessary. Best of all, you’re not going to strip your micro servo gears when you do this.
    2. This design did not come without concession.  I had to compromise on my ideal of removing overhangs.  All published parts to date have been printable with completely flat bases and without even slight overhangs to improve and ease printability.  In order to create the smaller pinion above, I had to add an overhang.  However, it’s a short overhang, which should still easy enough for most printers.
  2. Redesigned motor mounts.  I’ve changed the motor mounts so the fit the4 micro servo motors I purchased.  Hopefully they’ll fit yours too.  🙂  
  3. Improving the X axis.
    1. I’m reasonably happy with the X axis.  It’s not idea – but it works.  I’m designing a way to invert the X rack, so it is trapped by the X pinion and the entire robot can stay together.  This is still in an early design stage and so far requires lots of other design changes, so I’m trying to solve the Z axis and Y axis problems before working my way out to a better X axis.
  4. Improving the Y axis.  
    1. The problem.  The Y axis I created for the version 0.29 steady as the the Y axis in the version 0.18.  With the earlier version the Y axis slid on either side of the X motor mount, so that it was difficult for it to wobble side-to-side.  The newer version only slides along one side and incorporates this a long “fin” intended to stabilize the Y axis’ side-to-side motion.  That “fin” also had a long groove in it that was designed to help with up-and-down motion stability.  I think it worked for the most part.  In reality, the Y axis can wobble as much as a 1-2mm to the left and right in the new version.  One of the reasons I moved to the system used in the version 0.29 is that it allowed me to place all the motors in a very compact area while keeping the Y axis relatively short.  This conserved plastic, kept the part sizes small, and kept most of the mass in the robot in one area – which I felt would help reduce wobble.  
    2. The solution?  
      1. One obvious route is to go back to the Y axis alignment system used in version 0.18, where it slid along both sides of the X motor mount.  I moved away from this system because there didn’t seem to be a good way to mount the Z motor.  Not having a really great solution to mounting the Z axis motor isn’t that big a deal.  The current motor configuration is reasonably symmetrical and aesthetically pleasing, but not critical by any means.  As long as the robot isn’t operated at ridiculous speeds, the unsymmetrical motor mounting shouldn’t be that big of a problem.  While I have another design option, I think this is the system I’ll end up using.
      2. The other option is to cut a long groove in the Y axis with a tab sticking out of the X motor mount5 to keep it steady. As the Y axis slides back and forth, it should be kept in line by the tab.  Similar to this, I could also put a groove in the X axis where the Y axis slides to keep the Y axis in line.
  5. Improving the Z axis.
    1. The Z axis is a little wobbly.  While a little wibbly-wobbly-ness is to be expected, when there’s a little introduced with each axis, the effect is compounded in the end result.  This isn’t a problem for large gross manipulations, but becomes more obvious when drawing.  One of the reasons I’m tuning this robot to draw well6 is that if it can draw well, chances are it can do other tasks well too.
  6. Improving the X axis.
    1. I know this isn’t in any obvious order.  🙂  However, I’m reasonably happy with the X axis.  It’s not idea – but it works.  I’m designing a way to invert the X rack, so it is trapped by the X pinion and the entire robot can stay together.  This is still in an early design stage and so far requires lots of other design changes, so
  7. Things to try out.
    1. Drawing without pens.  Recently the idea occurred to me that drawing with a pen may not be ideal.  A pen is designed for the human hand – so it has heft, grip, length, and all sorts of other attributes that aren’t ideal for a robot.  However, the pen cartridge/ink reservoir is shorter and has considerably less mass.  So, why not just pull that out of a pen and scrap everything else?  Heck, there might even be an interesting way to incorporate the pen’s own spring into the design.  I think it would be incredibly interesting to use that spring as the basis for a pen holder.7
    2. Smaller, more numerous teeth.  I honestly don’t know if these are beneficial.  I’m guessing there’s a law of diminishing returns when it comes to using smaller teeth.  Smaller teeth are harder to print and may be easier to break or more prone to skipping.  On the other hand, it is possible they might allow for smoother and more reliable operation.  I’ll try it both ways and let you know!
    3. Closer meshing between pinions and racks.  I’ve designed the robot with a degree of “slop” between the pinion and rack teeth.  This is so that I can make parts that I know will fit and work on many different robots.  I like to think I’ve got my Replicator 1 dialed in pretty well – so it’s entirely possible I could place the teeth closer together.  I figure closer meshing probably involves more stress on the motors, but that’s another problem for another day and another blog post.  😉
    4. Designing with fasteners in mind.  One interesting solution from Joseph is to put zip ties around the various parts to keep them in place.  The zip ties are apparently smooth enough that the parts still slide and stay together.  I love this solution.  I think it could be even better if zip tie solutions were further incorporated into the design as fasteners.
    5. Putting it all together.  The new-ish design you see at the top allows for the use of servo set screws without actually requiring them.  They’ll help, but aren’t critical.
  1. The Y axis []
  2. Even with foam rubber stickers! []
  3. There’s a slightly sickening crunch as you do.  I don’t recommend it []
  4. Many, many []
  5. This makes more sense if you’re inside my head []
  6. As well as can be expected for a bunch of plastic parts and cheap motors []
  7. I’m not sure if this would be cannibalistic or meta.  Thoughts? []